HOW CAN WE HELP YOU? Call 1-800-TRY-CHOP

In This Section
CIRRUS High Speed Fileshare Help Guide
Published on February 3, 2023 · Last updated 1 year 2 months ago
Find detailed instructions on CIRRUS High Speed Fileshare.
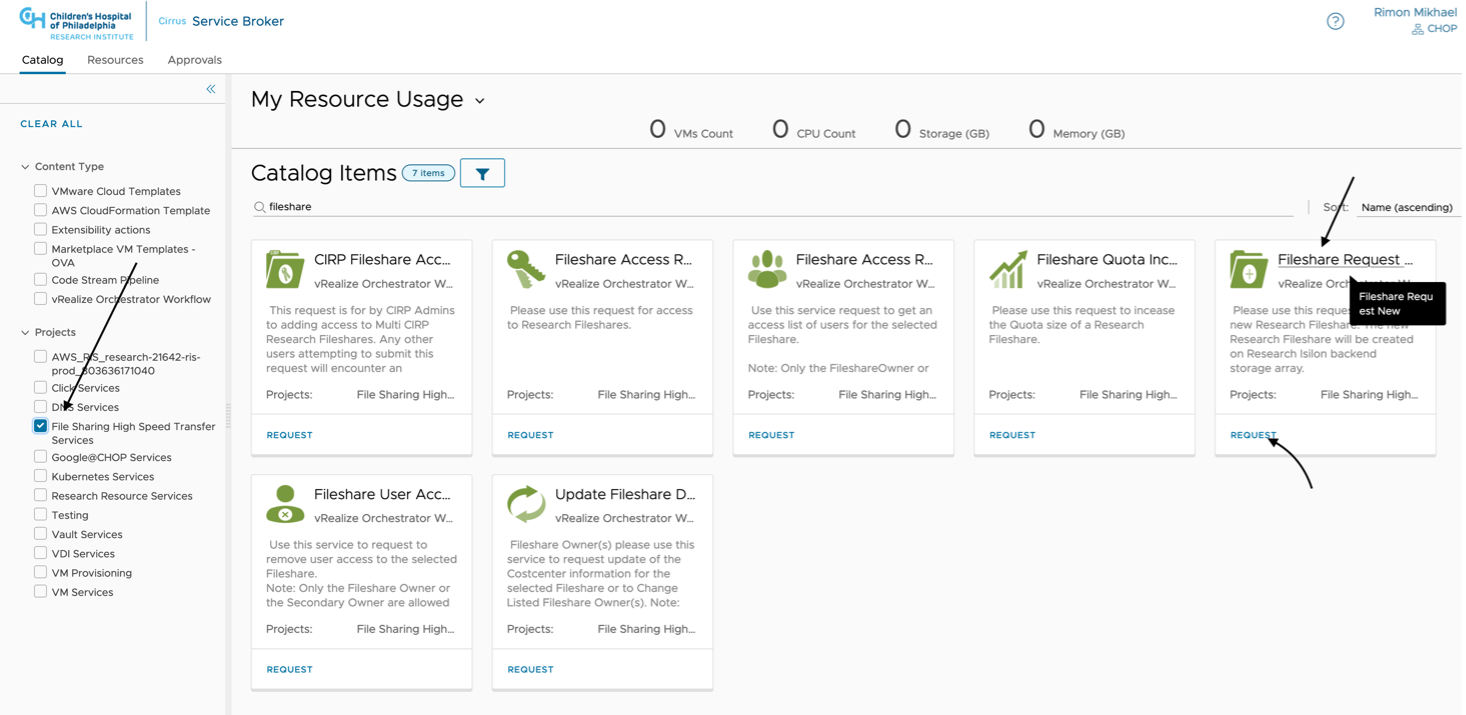
Service: Requesting a New Research Fileshare
Requisites: A Valid Research CostCenter and Activity
Step 1
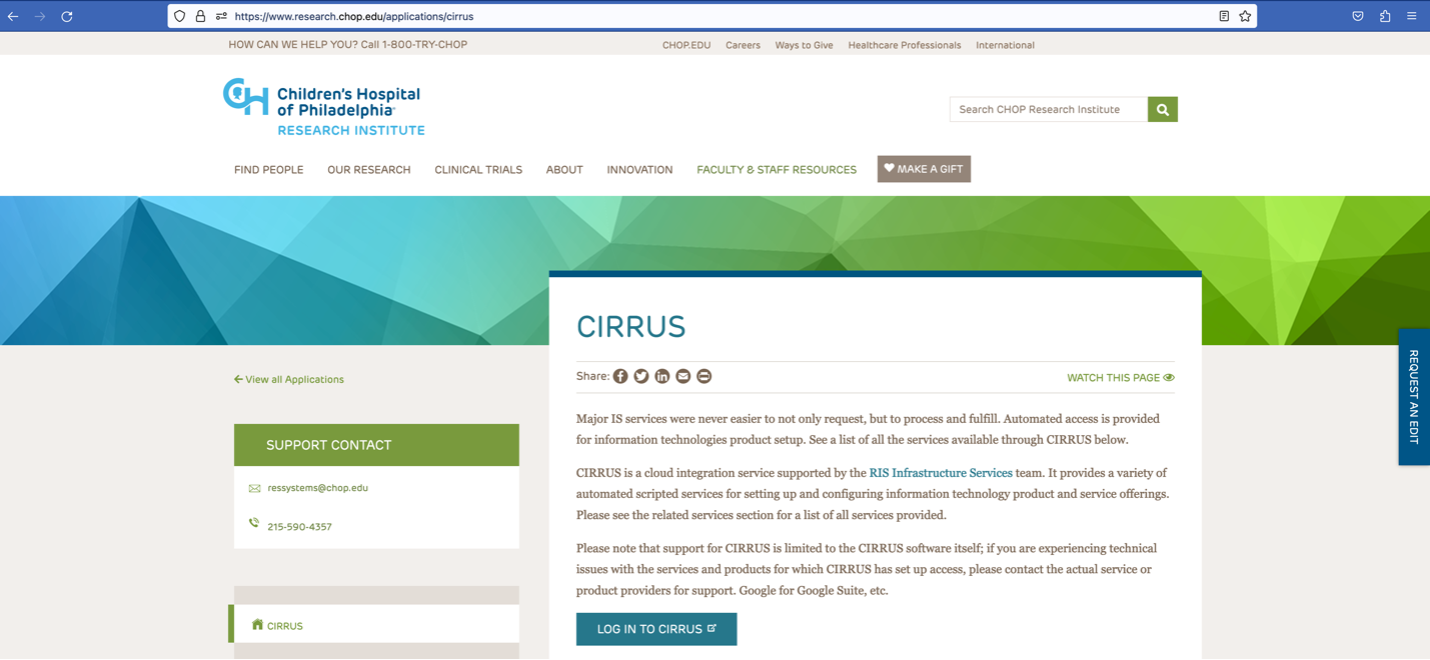
Connect to https://www.research.chop.edu/applications/cirrus and click "Cirrus Log In"
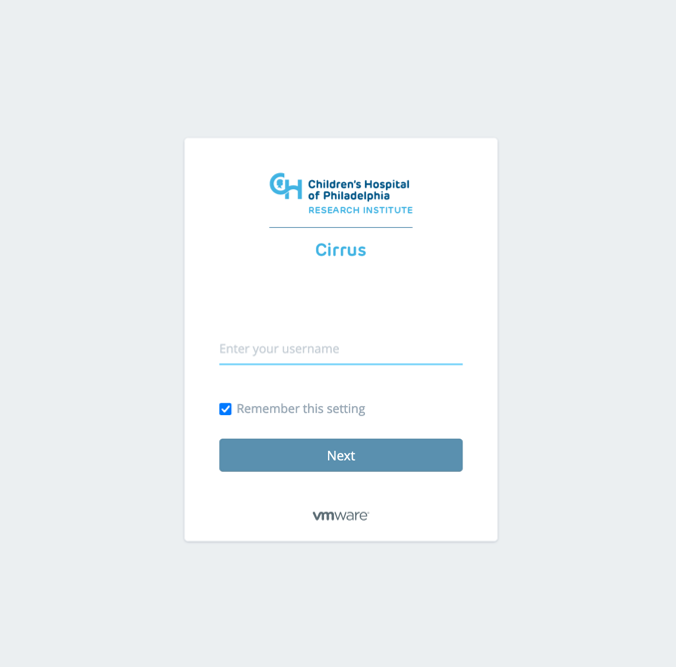
Step 2
At the Login prompt, enter your CHOP username, click "Remember this setting" and Click "Next"
Step 3
Enter your CHOP Password and Click the "Sign in" button

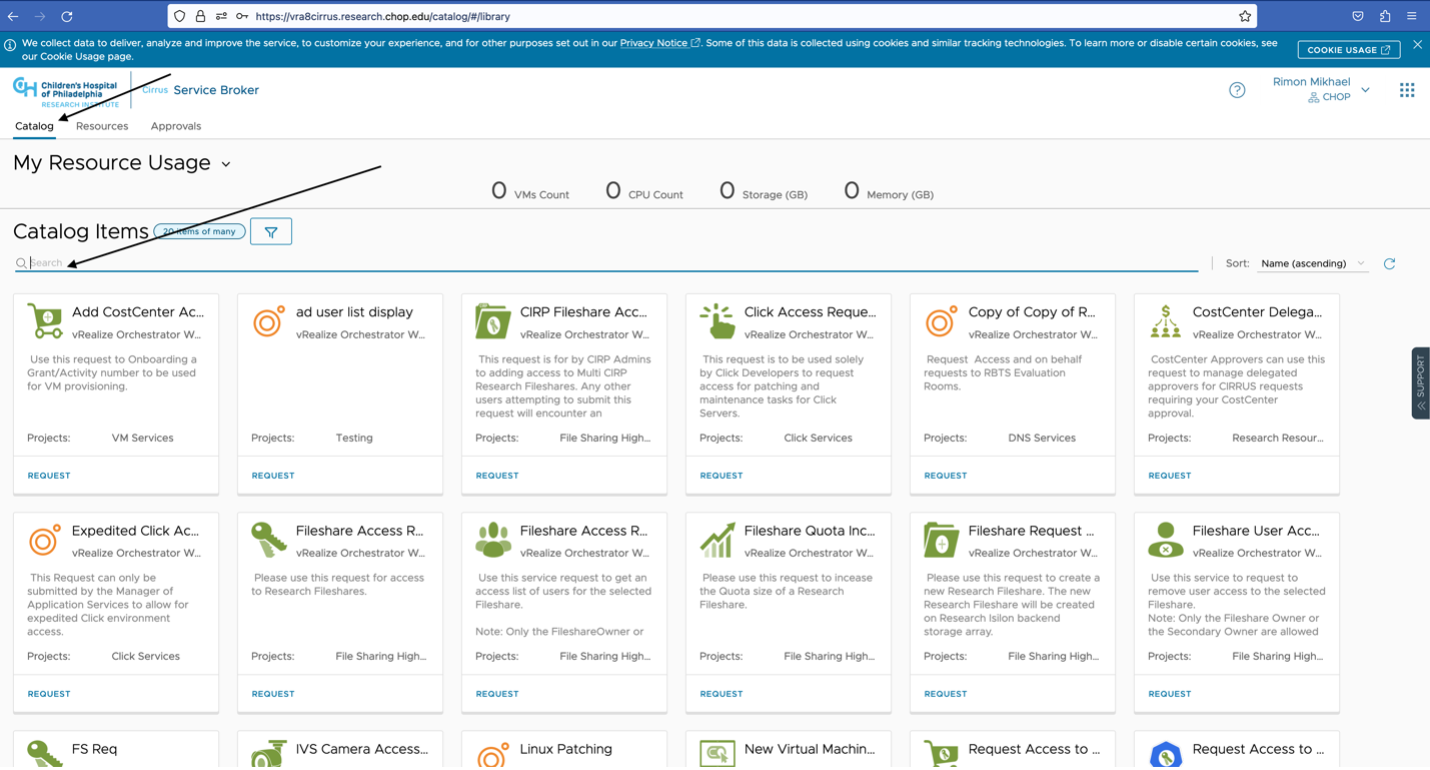
Step 4
Click on Catalog tab (It should be the default when first log in), also you are able to see any virtual machines resources were deployed in our virtualization environment.
Step 5
In the Search for Catalog Items field, type "New FileShare" and click "Fileshare Request New"
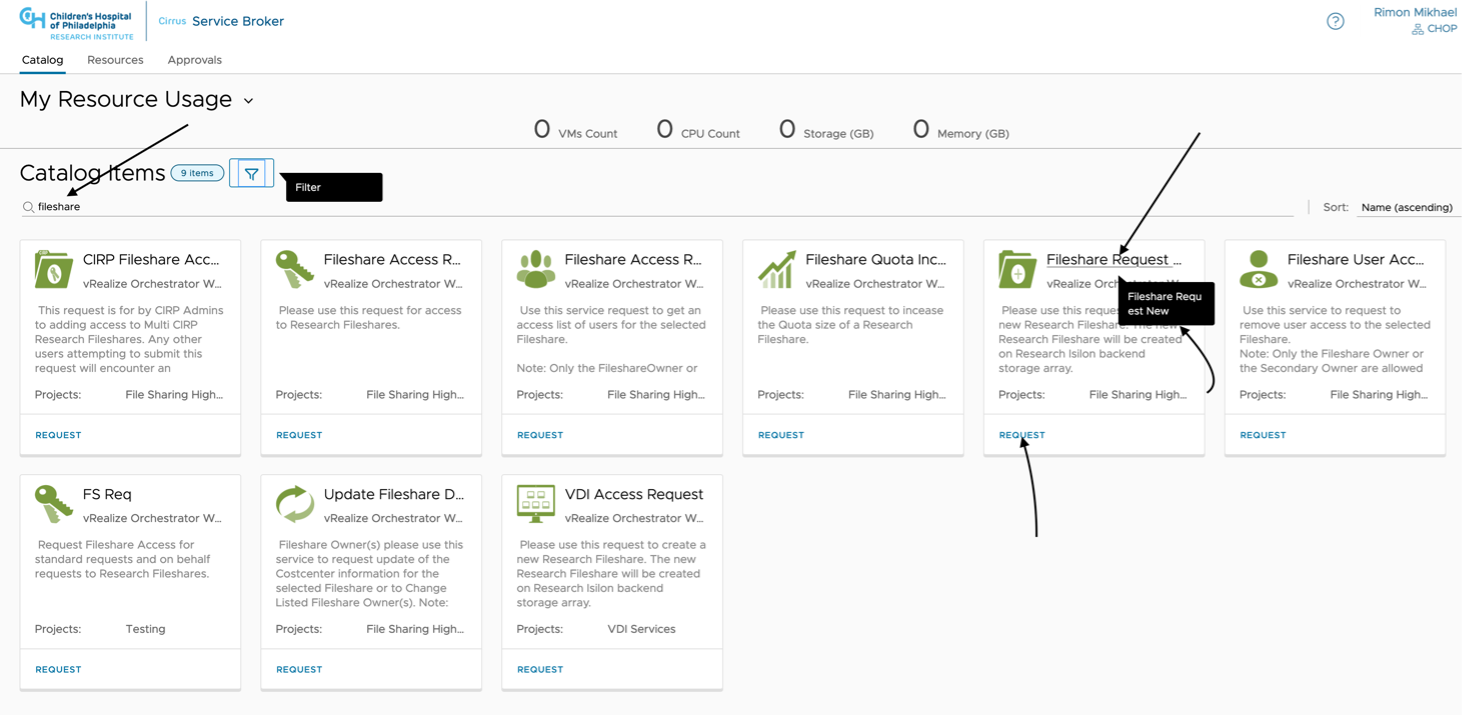
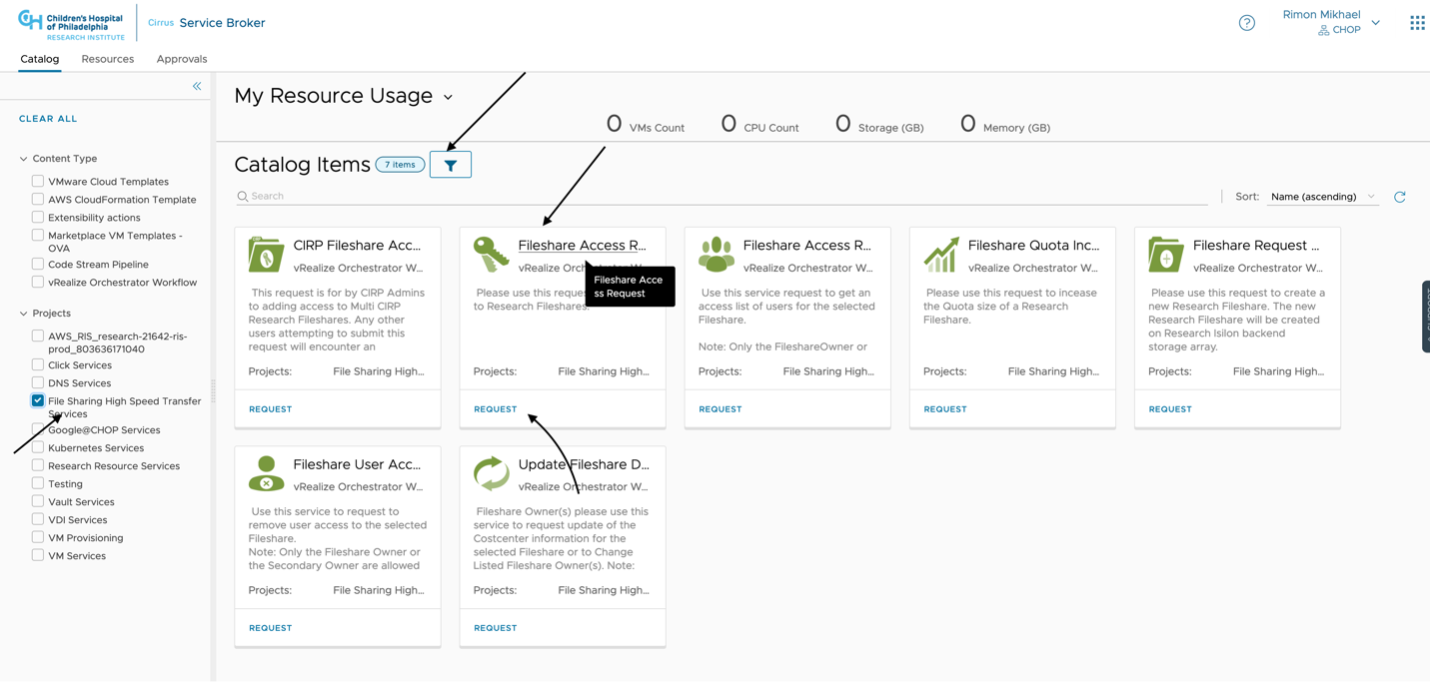
Or Click to Apply Filter and Select "File Sharing High Speed Transfer Services" catalog item in the left navigation pane
Step 6
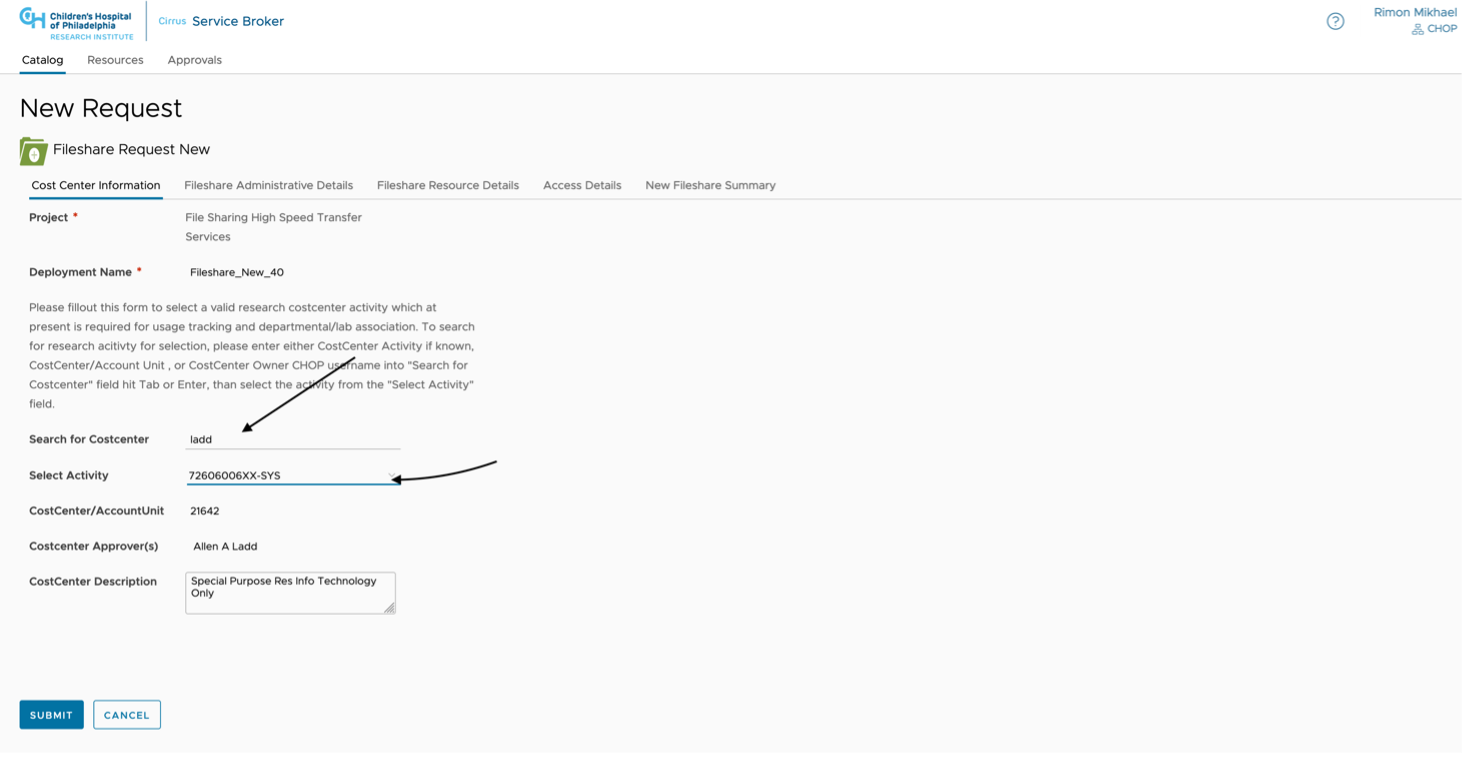
Please click the Cost Center Information Tab.
Under the Cost Center Information tab, please search and choose your Cost Center and Grant ID. You can search the field by grant owner or grant number or cost center number.
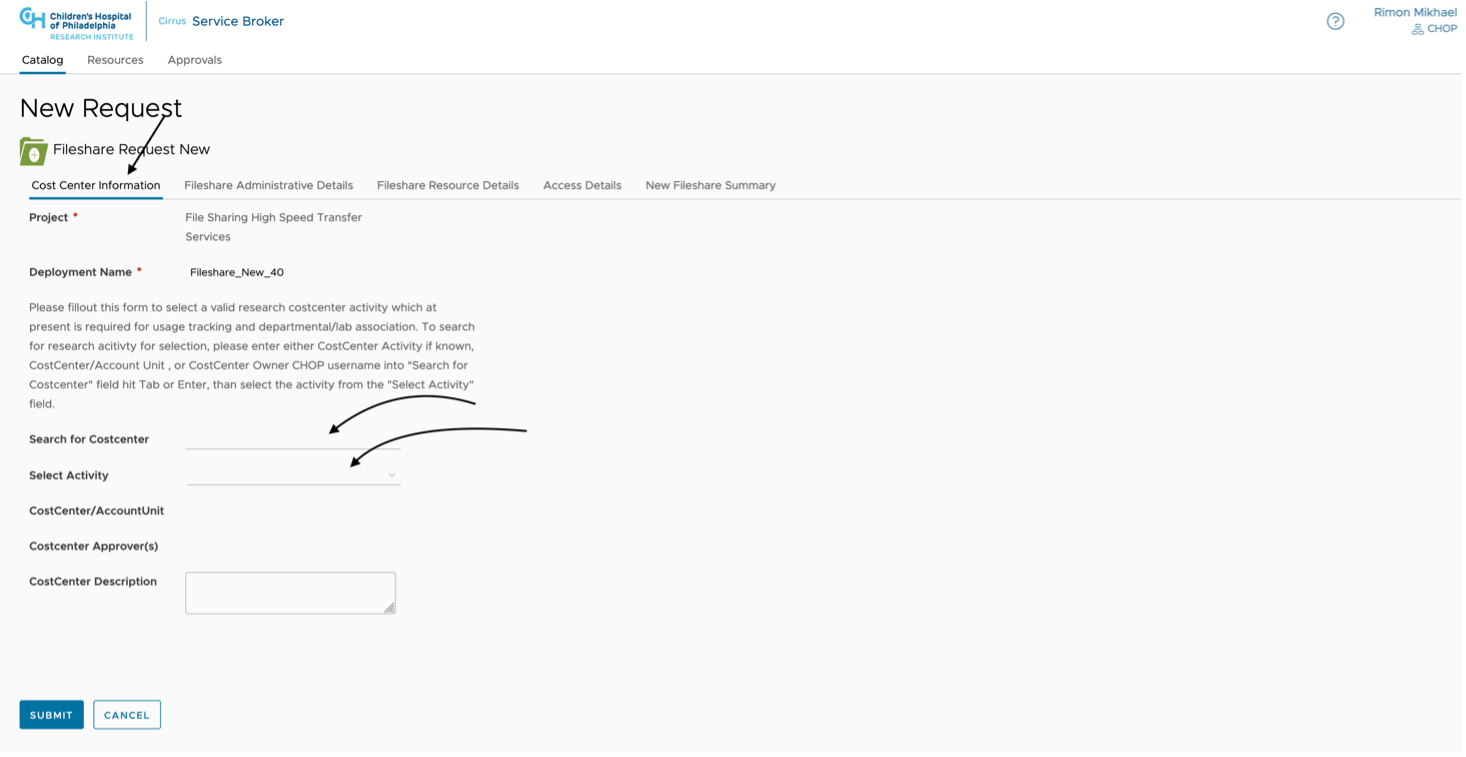
Select grant field going to populate accordingly. Please choose your grant from the drop-down menu
Step 7
Please Click Fileshare Administration Details
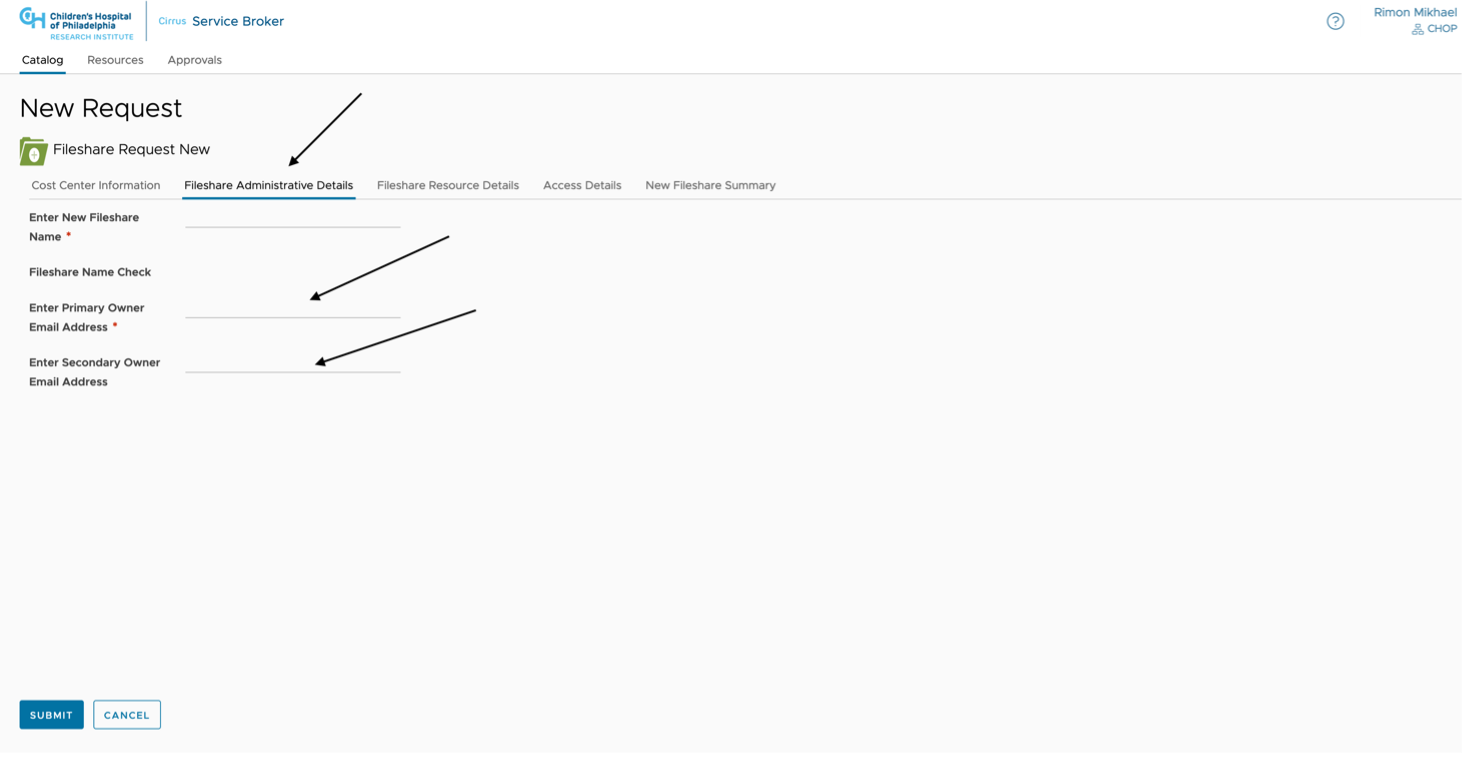
Step 8
Please Enter Fileshare name and the email of the primary and secondary Owner(read the general tips section for more information)
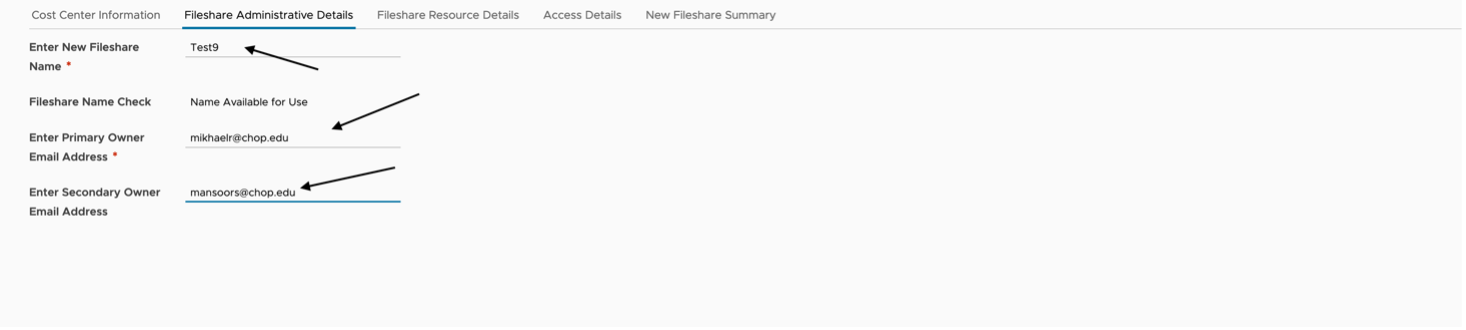
Step 9
Choose the fileshare Resources Details tab

Step 10
Please choose if the file needs mounting on the High performance computer Unit
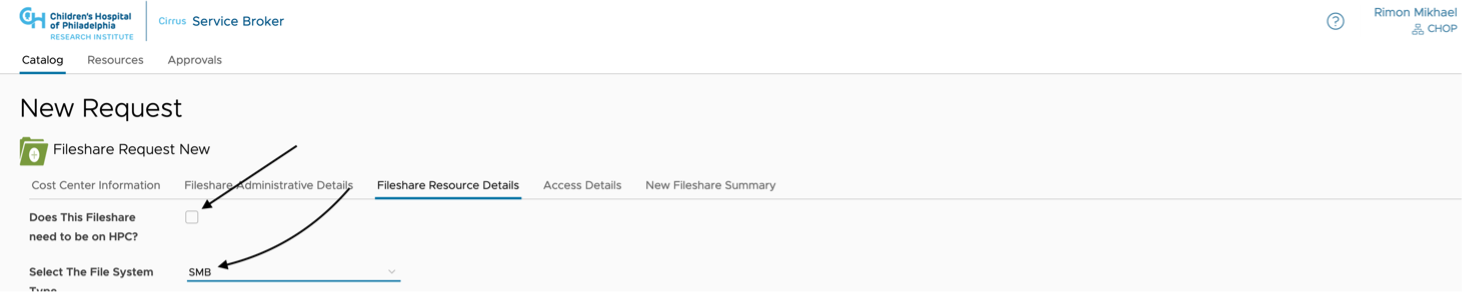
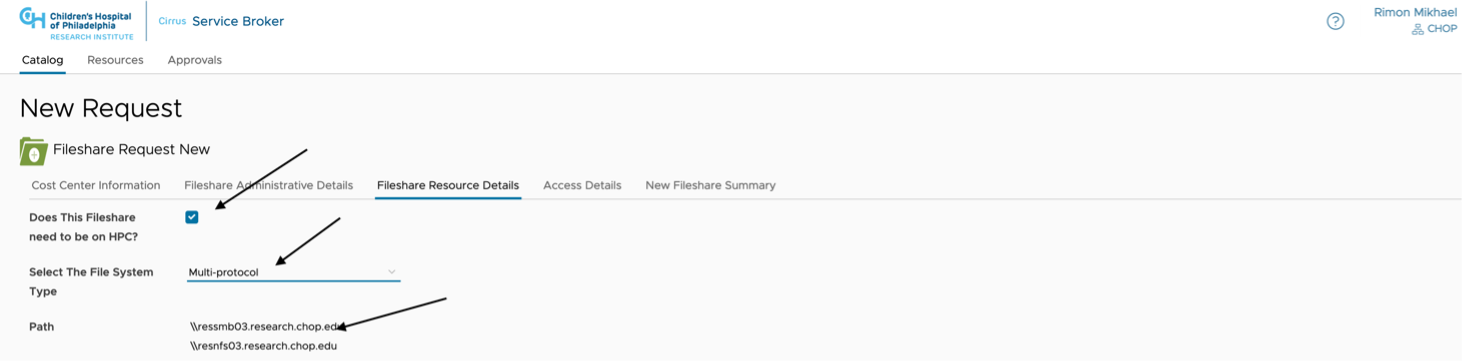
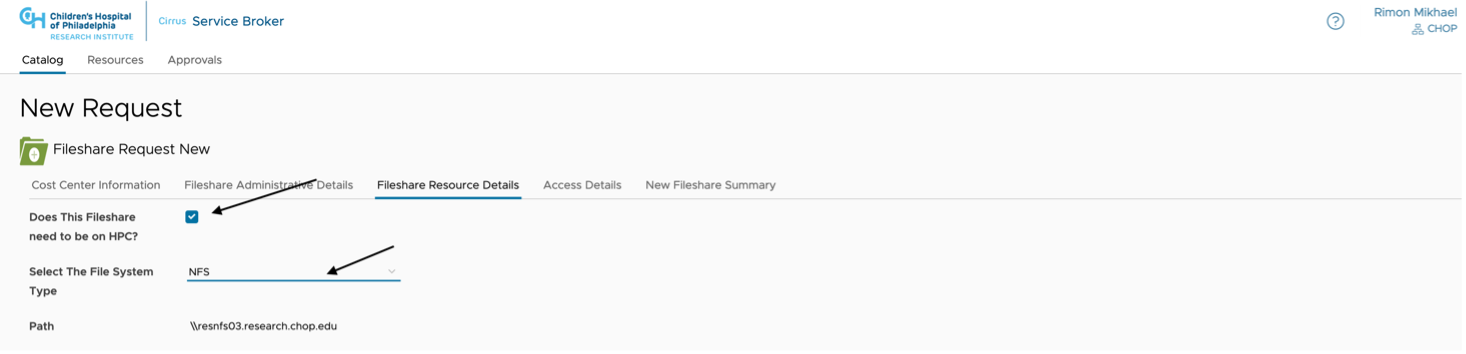
Step 11
Please choose the filesystem type mount.
If it needs to be mounted only on windows please choose "SMB" protocol and leave the HPC box unchecked
If it needs just to be mounted on Linux – a linux server already provisioned on our virtualization cluster – please check the HPC box and choose "NFS" as protocol.
If it needs to be mounted on the HPC and linux and windwos, please choose "Multiprotocol" and check the HPC box in the form input.
Step 12
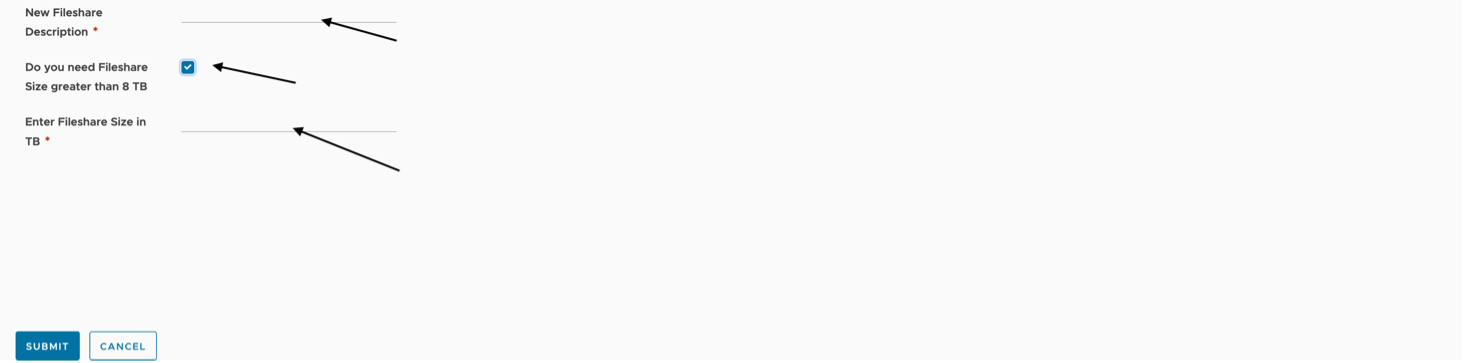
Please Leave description for the Fileshare and Choose Size, If Size if more than 8 TB choose the Greater than 8 Tb form input and check the box for sizer greater than 8 TB and fill the required space in the form input.

Step 13
Please Choose the Access Details Tab

Step 14
Please follow the instruction to give access to the resource to the appropriate users
Enter Chop user first name or last name and choose the user from the pop-up menu. If you need to add other users, please click the 'x1 icon or press delete to remove the name typed and type another user first or last name then choose the new user to add to the list – as per the screenshot below.


Step 15
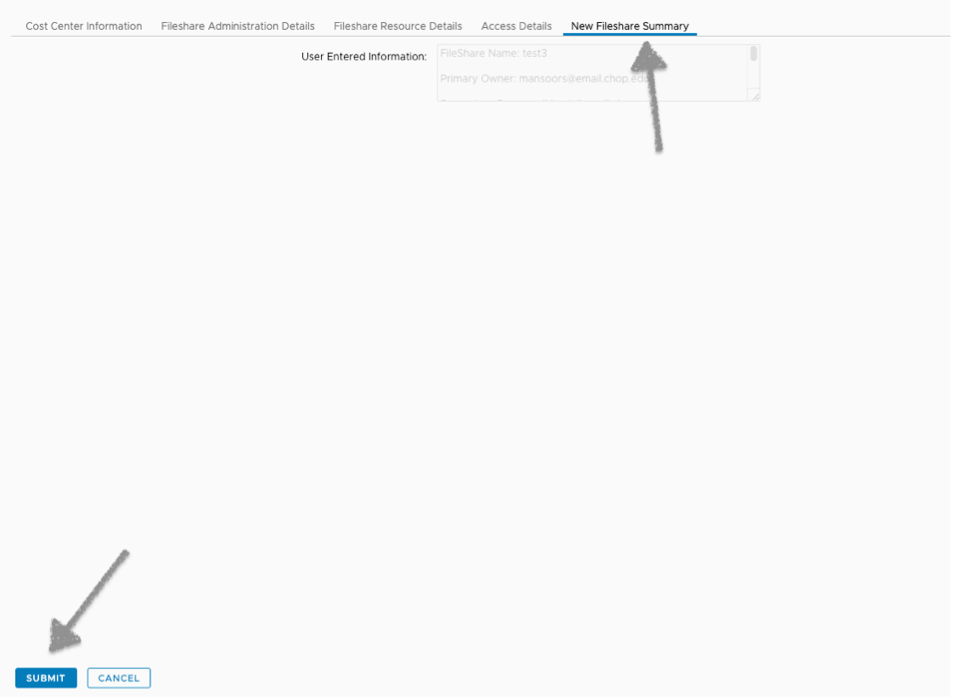
Review the Summary and then choose submit to submit your request
Step 16: General Tips to Follow
Please follow the instructions on the screen to enter the New Fileshare details and fill the required fields in each tab
![]()
- Follow the instructions on the screen to enter the New Fileshare details
- Keep fileshare names as short and as intuitive as you can. This make it easier for you and others to find and map drives when needed
- Primary and secondary email addresses are used to identify who has the authority to grant access to other individuals once the fileshare is in place
- Currently CostCenter information is used for resource tracking. There is no direct chargeback at this time
- If the fileshare needs to be on the HPC/Respublica, Select Yes to question "Does This Fileshare need to be on HPC"
- Select the fileshare system type
- The default size is 500GB and can be increased as needed from the dropdown selection. If you need more space than 8 TB, than answer Yes to question "Do you need Fileshare Size greater than 8 TB" and enter size in whole number
- If the fileshare is more than 8TB, the approval process will have to go through IS Infrastructure Manager approval
- Follow the instructions, to add users for ReadWrite/ReadOnly Access
Step 17
When complete click the "Submit" button at the bottom of the page
If you need to change something select the "Back" button

Process After Submission
Once the request is submitted if follows this process.
- An email is generated to the PI or Business Manager responsible for the CostCenter.
- The mail recipient has the option to Approve or Reject the request.
- To reject the request the Approver simply Clicks the Reject link in the email and hits the Send button in the response email. Rejected requests generate an email to the request simply stating that the request was denied by the Approver
- To Approve the request the Approver simply Clicks the Approve link in the email and hits the Send button in the response email. Approved request continues processing
- Two Active Directory groups are created
- A Read Write Group - FileshareName_RW
- A Read Only Group – FileshareName_RO
- The Fileshare is created and the groups granted access
- Two Active Directory groups are created
An email is sent to the requestor notifying them that the request is complete.
Service: Request Access to Research Fileshare
Step 1
Connect to https://www.research.chop.edu/applications/cirrus and click "Cirrus Log In"
Step 2
At the Login prompt, enter your CHOP username, click "Remember this setting" and Click "Next"
Step 3
Enter your CHOP Password and Click the "Sign in" button
Step 4
Click on Catalog tab (It should be the default when first log in), also you are able to see any virtual machines resources were deployed in our virtualization environment.

Step 5
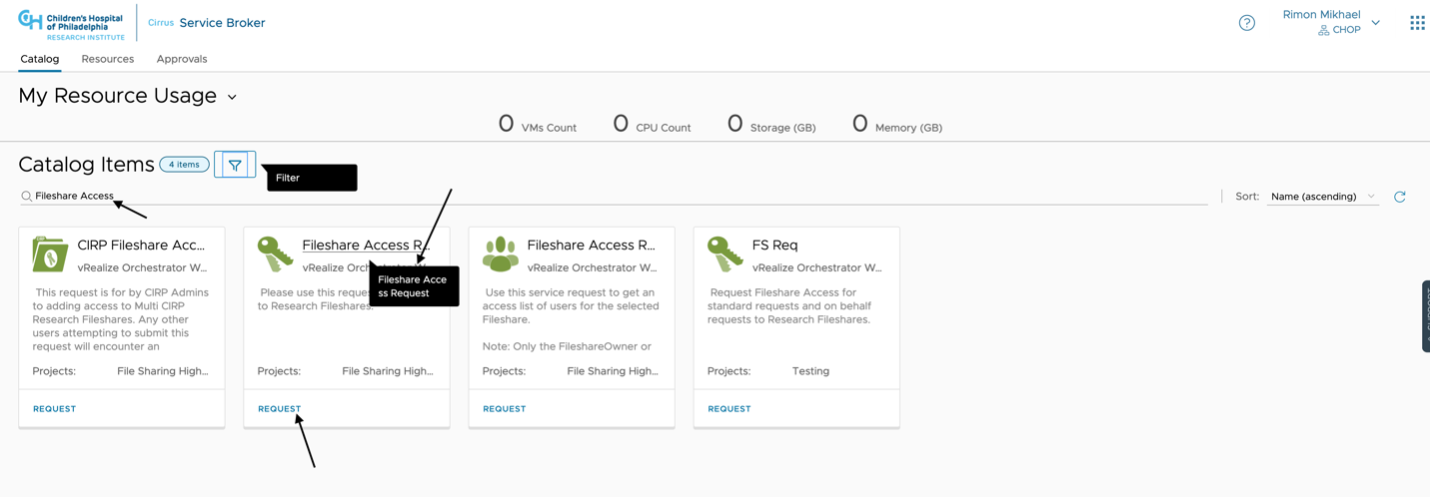
In the Search for Catalog Items field, type "FileShare access" and click "Request Fileshare Access"
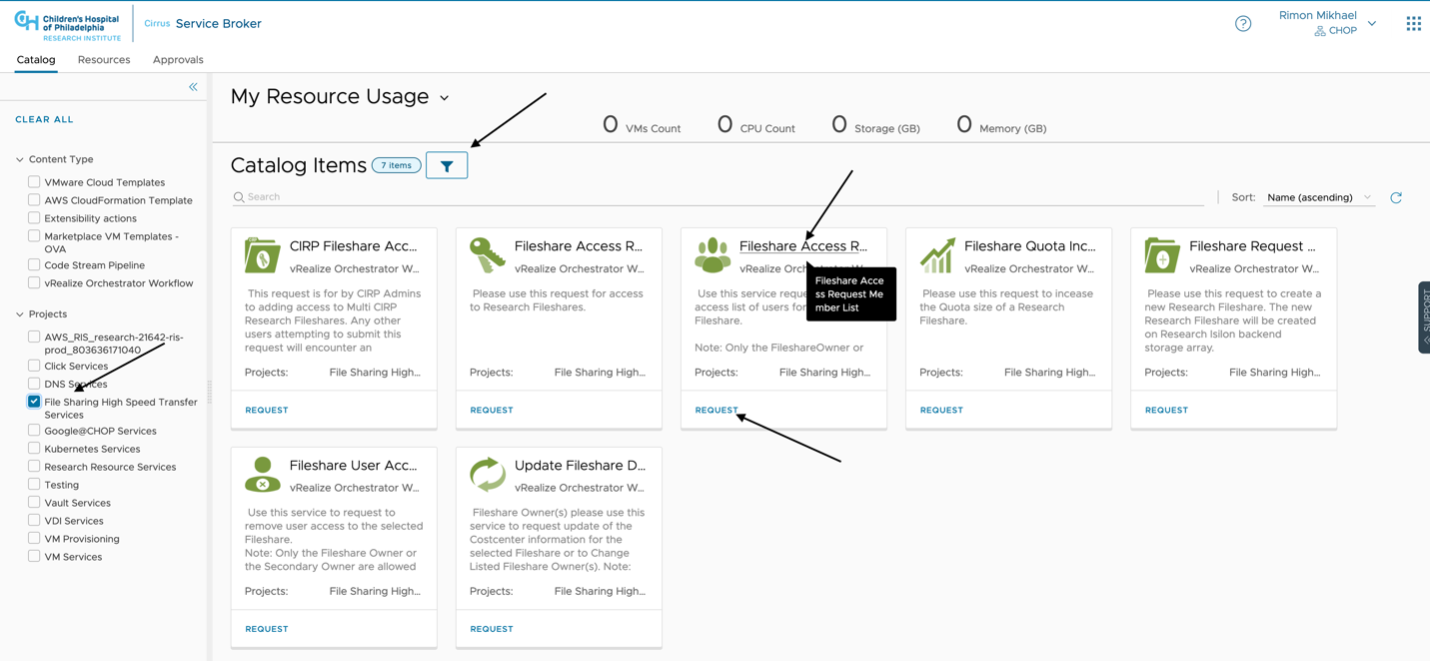
Or Click to Apply Filter and Select "Fileshare Services" catalog item in the left navigation pane
Step 6
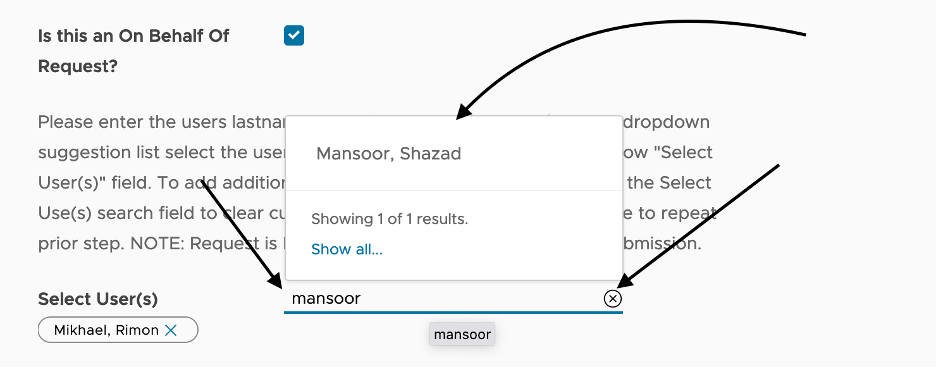
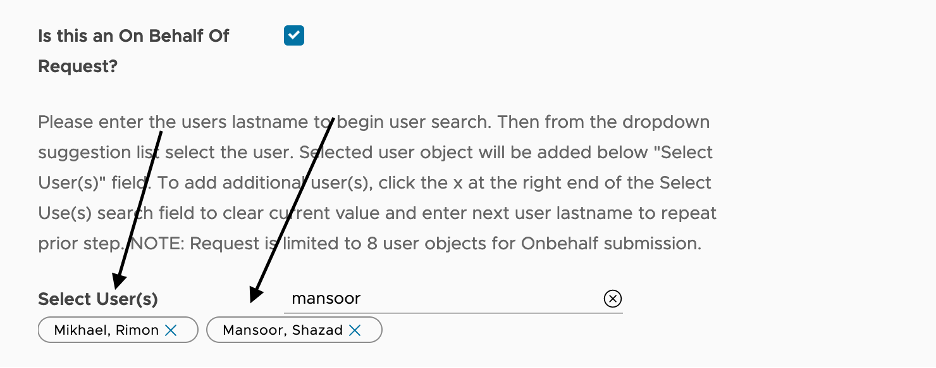
You have the choice to either make the request yourself or on behalf of other users.
If this is an On Behalf of Other Users Request, check the box for "On Behalf Of Request" and follow the instructions.
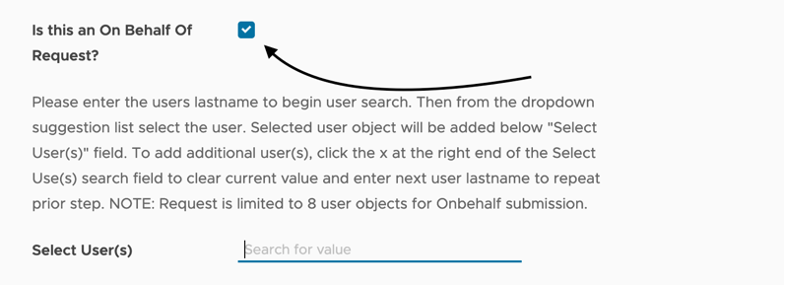
Enter Chop user first name or last name and choose the user from the pop-up menu. If you need to add other users, please click the x icon to remove the name typed and type another user first or last name then choose the new user to add to the list – as per the screenshot below.

Step 7
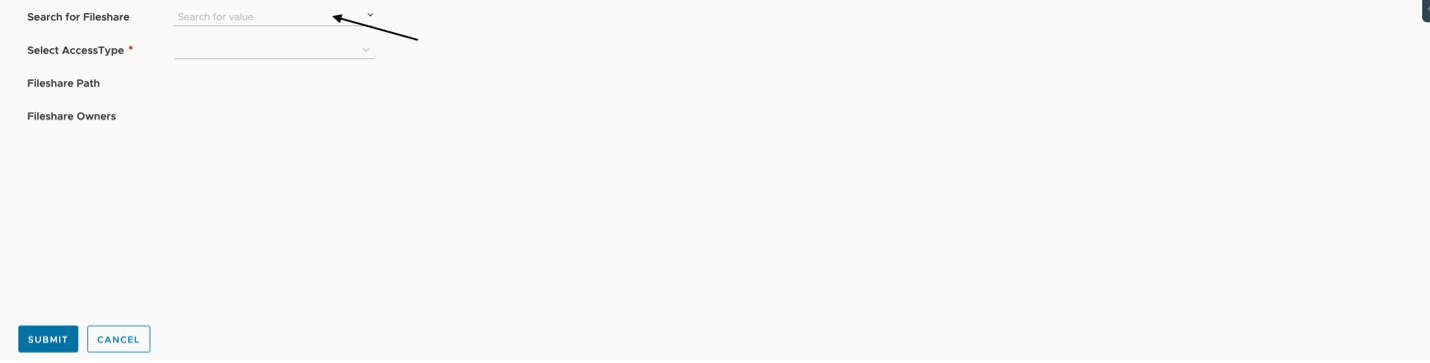
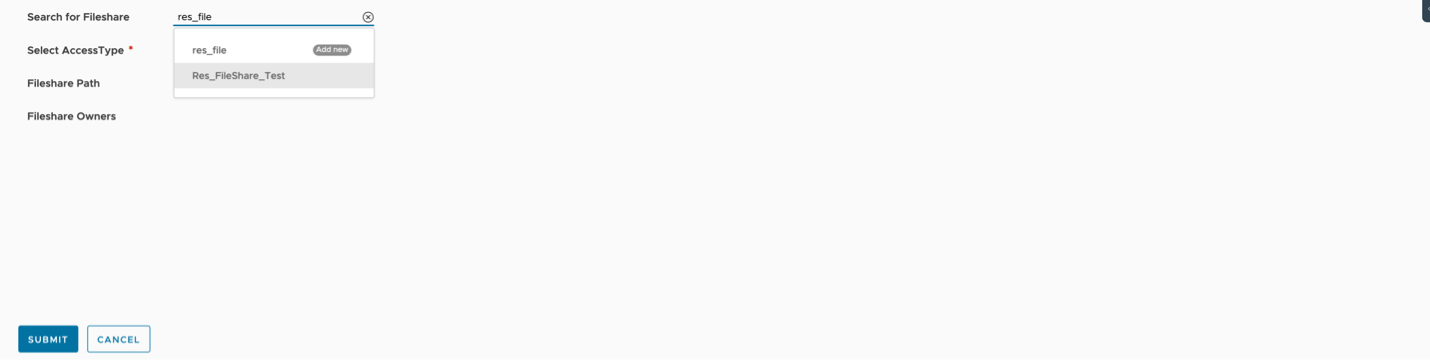
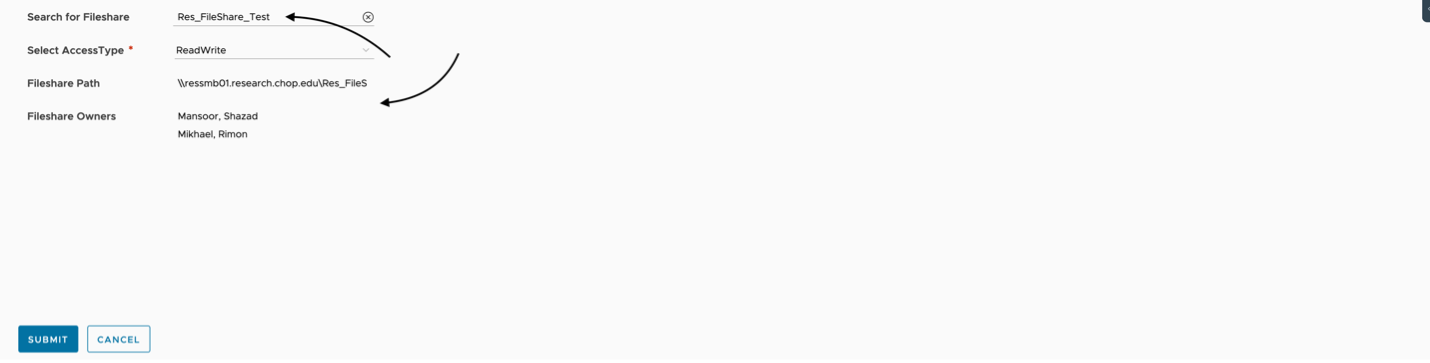
Select the appropriate fileshare from the dropdown list or enter a search term in "Search Fileshare" to filter Fileshares. Note: Fileshare Path and Owner(s) fields will auto-populate.
Step 8
Select the access type you are requesting. Typically the available options are ReadOnly and/or ReadWrite.
![]()
Step 9
Click "Submit" to finish
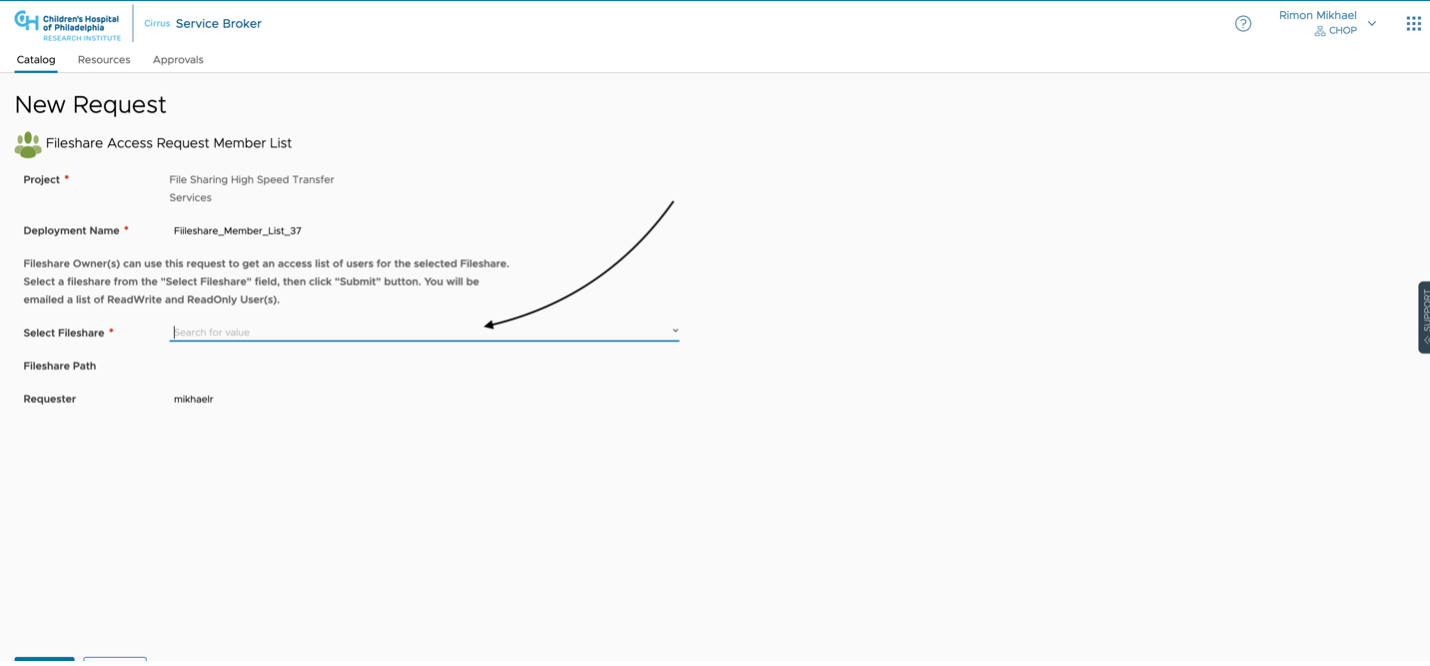
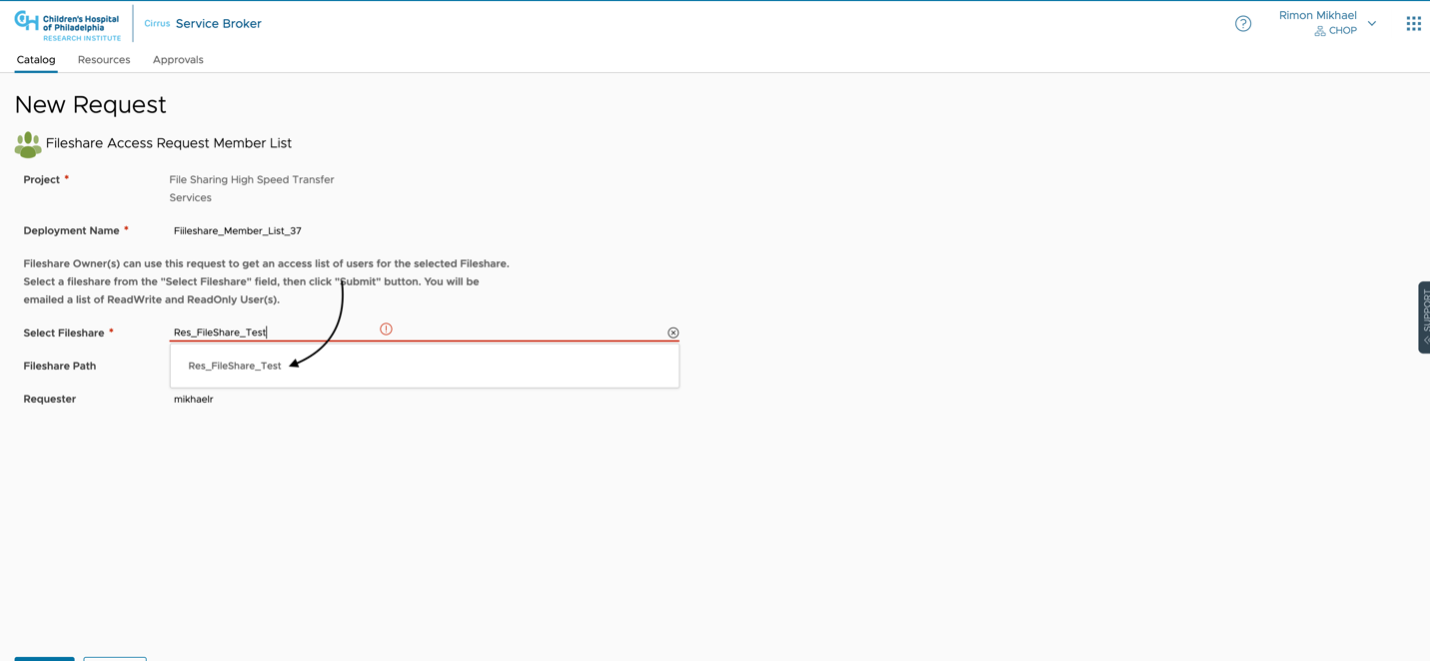
Service: Request a List of Fileshare Members
Note: Only Fileshare Owner(s) can submit this request.
Step 1
Connect to https://www.research.chop.edu/applications/cirrus and click "Cirrus Log In"
Step 2
At the Login prompt, enter your CHOP username, click "Remember this setting" and Click "Next"
Step 3
Enter your CHOP Password and Click the "Sign in" button
Step 4
Click on Catalog tab (It should be the default when first log in), also you are able to see any virtual machines resources were deployed in our virtualization environment.

Step 5
In the Search for Catalog Items field, type "FileShare" and click "Request Fileshare Access Member List"
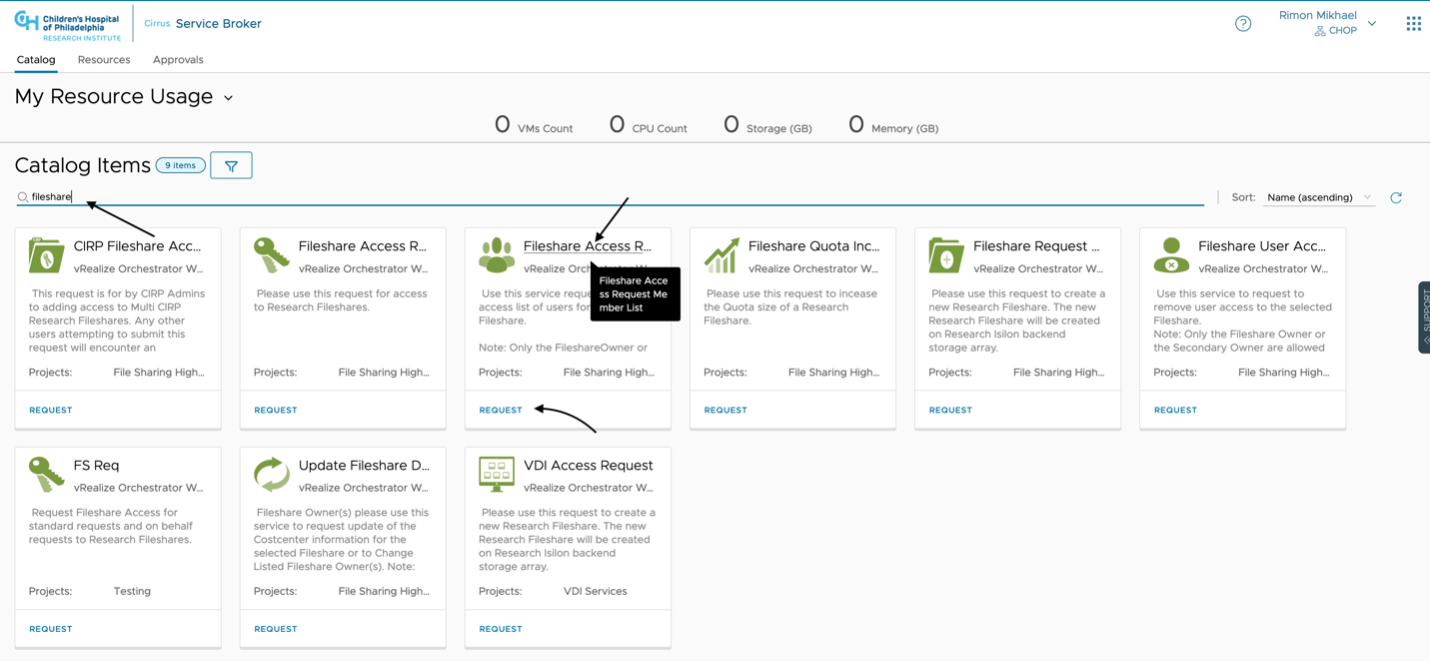
Or Click to Apply Filter and Select "Fileshare Services" catalog item in the left navigation pane
Step 7
Select the appropriate fileshare from the dropdown list or enter a search term in "Search Fileshare" to filter Fileshares. Note: Fileshare Path and Owner(s) fields will auto-populate.
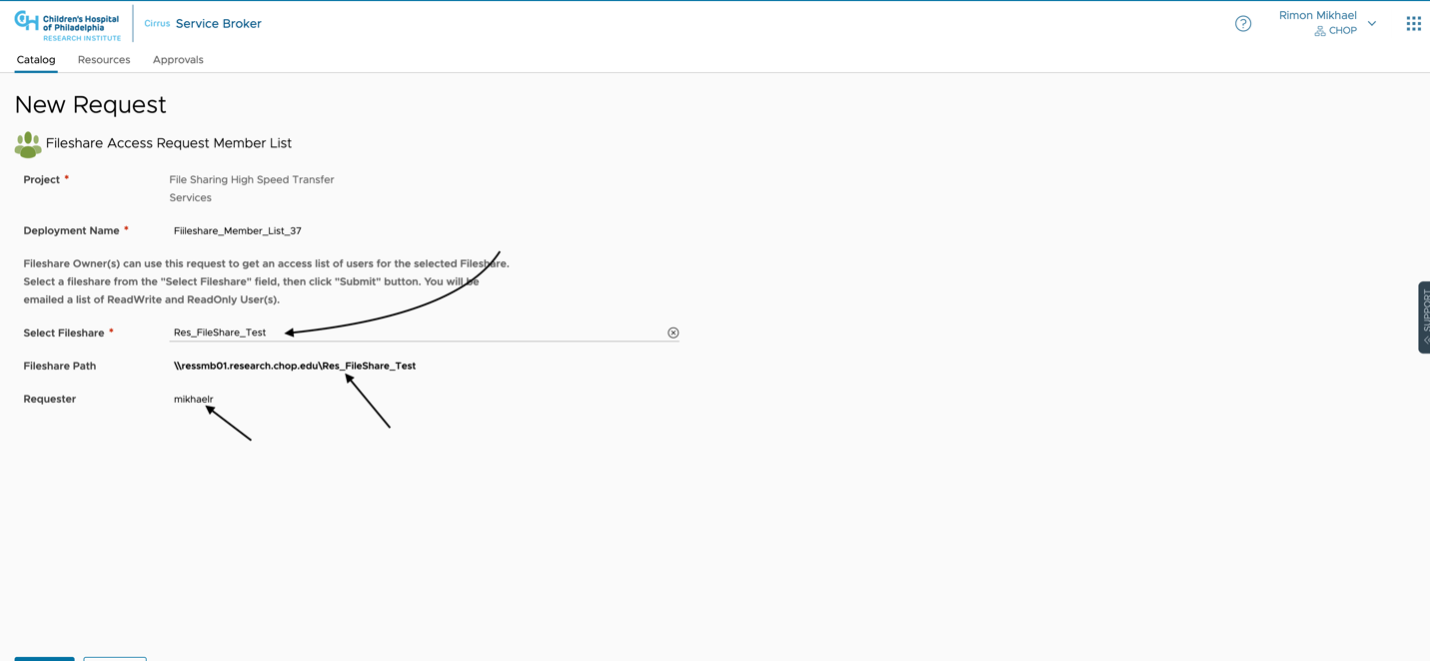
Step 8
Finish by Clicking "Submit"
Service: Request for Fileshare Size Increase
Step 1
Connect to https://www.research.chop.edu/applications/cirrus and click "Cirrus Log In"
Step 2
At the Login prompt, enter your CHOP username, click "Remember this setting" and Click "Next"
Step 3
Enter your CHOP Password and Click the "Sign in" button
Step 4
Click on Catalog tab (It should be the default when first log in), also you are able to see any virtual machines resources were deployed in our virtualization environment.

Step 5
In the Search for Catalog Items field, "FileShare" and Choose "Request Fileshare Quota Increase"
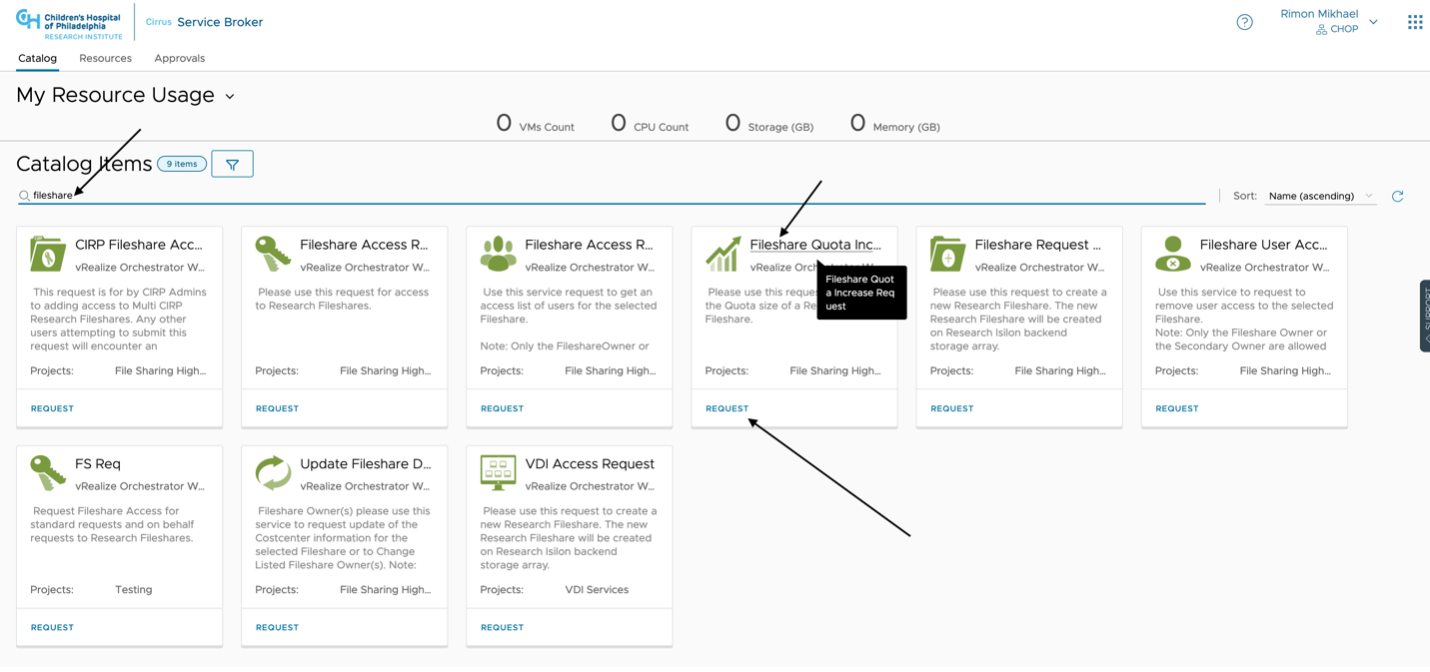
Or Click to Apply Filter and Select "Fileshare Services" catalog item in the left navigation pane
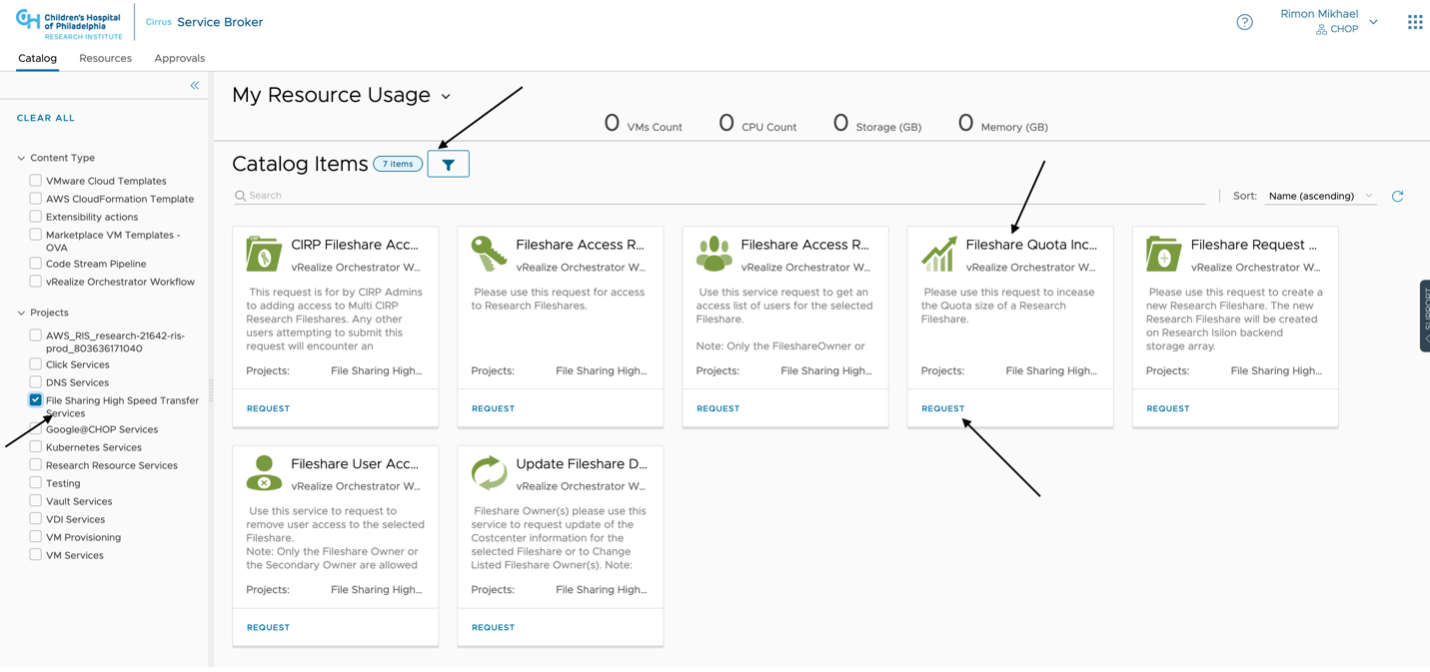
Step 6
Select the appropriate fileshare from the dropdown list or enter a search term in "Search Fileshare" field to filter Fileshares.
Note: Fileshare Path, Owner(s) and fileshare current capacity & usage fields will auto-populate.
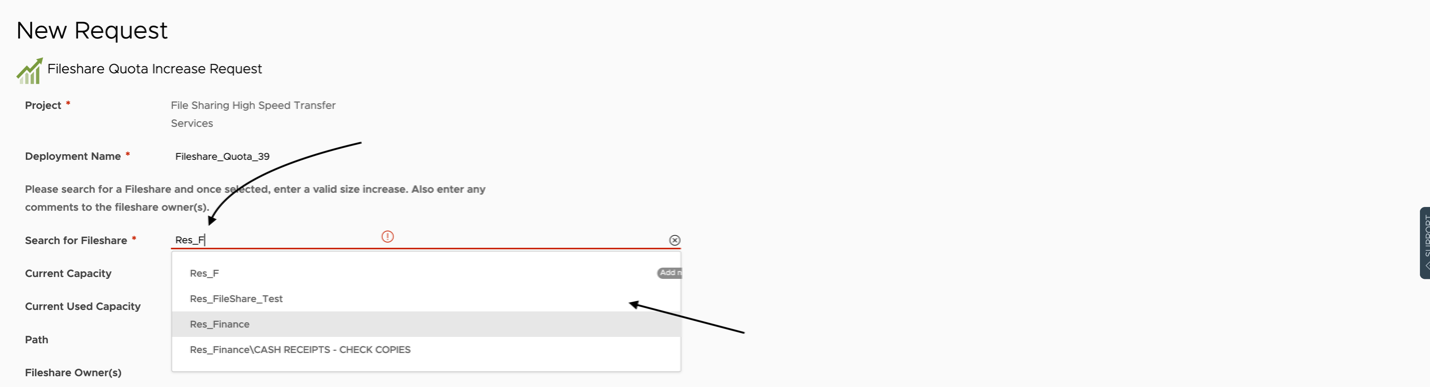
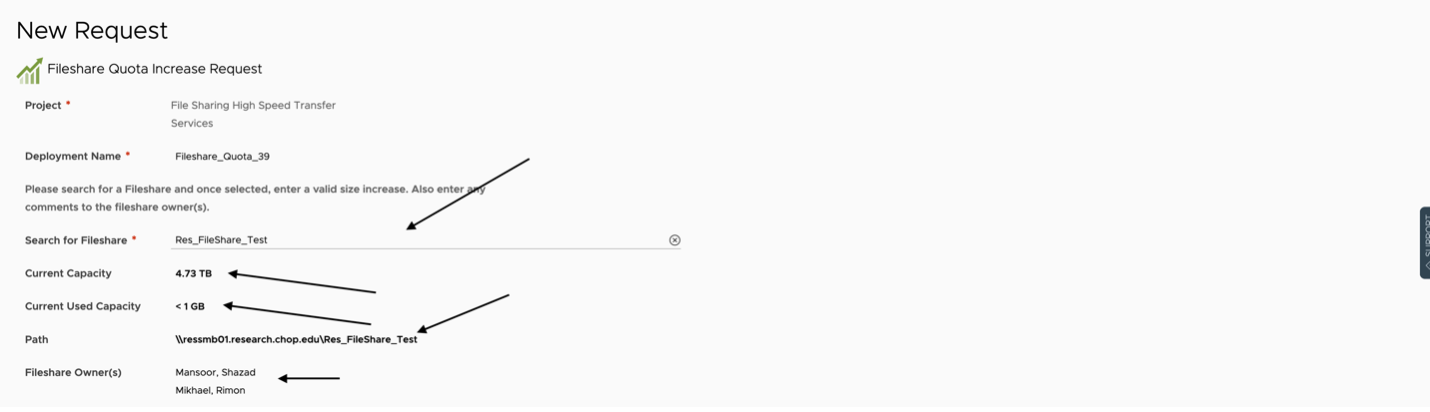
Step 7
Select the unit type and enter the amount to increase size by.


Step 8
Provide a comment if required and click "Submit"
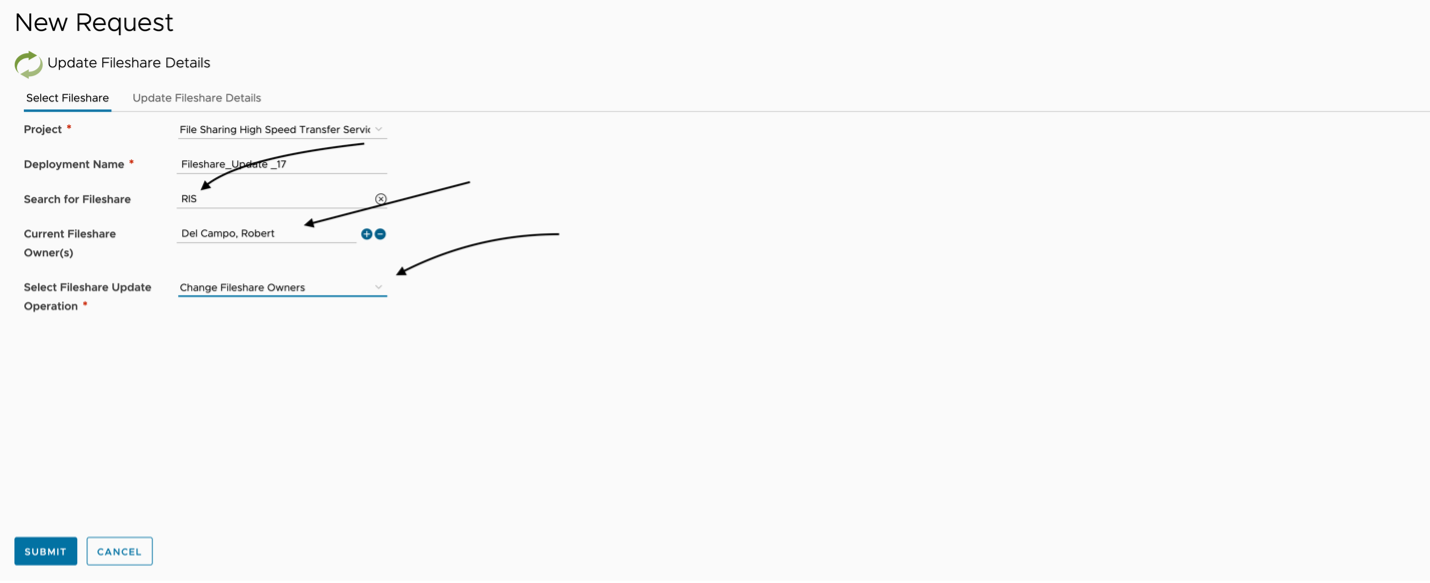
Service: Update Costcenter and activity or Ownership of a Fileshare
Requisites: "CostCenter ", "Activity", "New Primary Owner" and/or "Secondary Owner"(Optional)
Step 1
Connect to https://www.research.chop.edu/applications/cirrus and click "Cirrus Log In"
Step 2
At the Login prompt, enter your CHOP username, click "Remember this setting" and Click "Next"
Step 3
Enter your CHOP Password and Click the "Sign in" button
Step 4
Click on Catalog tab (It should be the default when first log in), also you are able to see any virtual machines resources were deployed in our virtualization environment.

Step 5
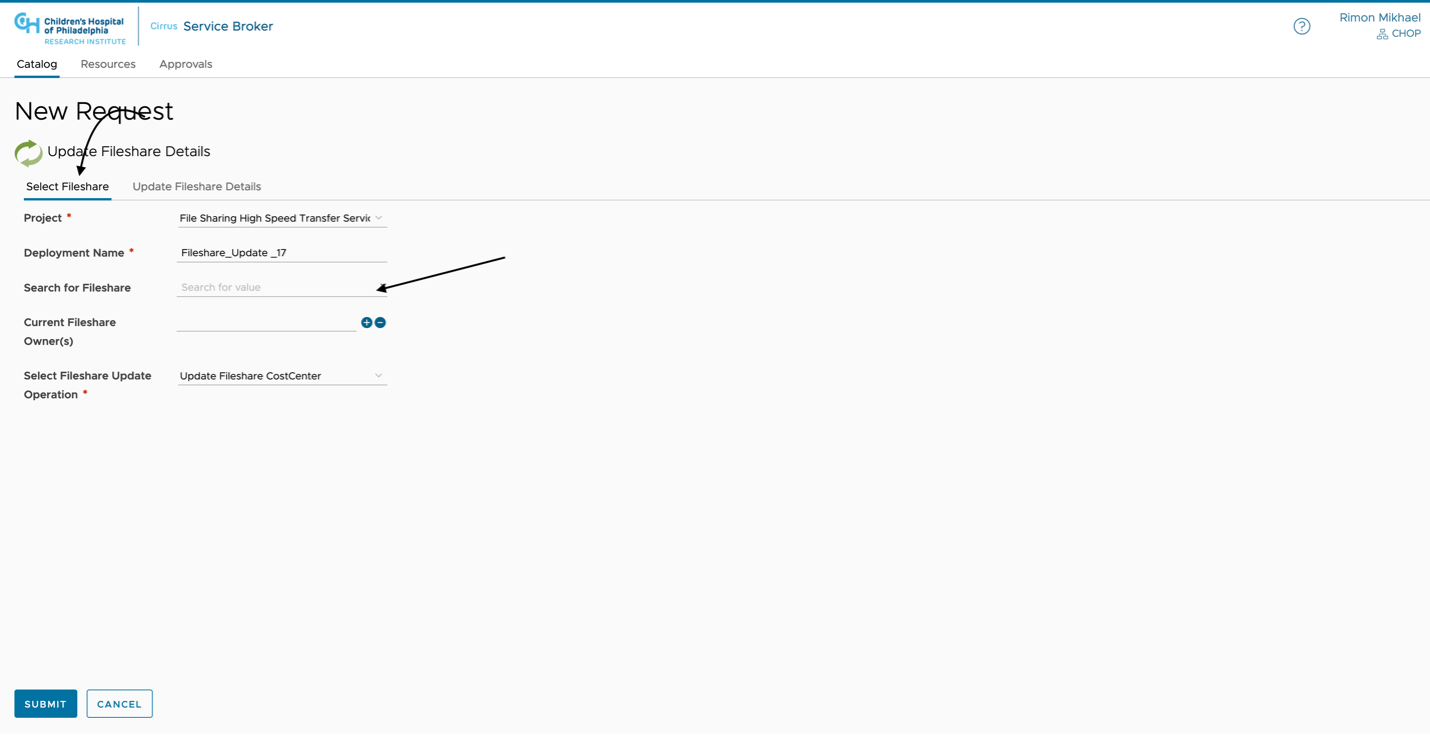
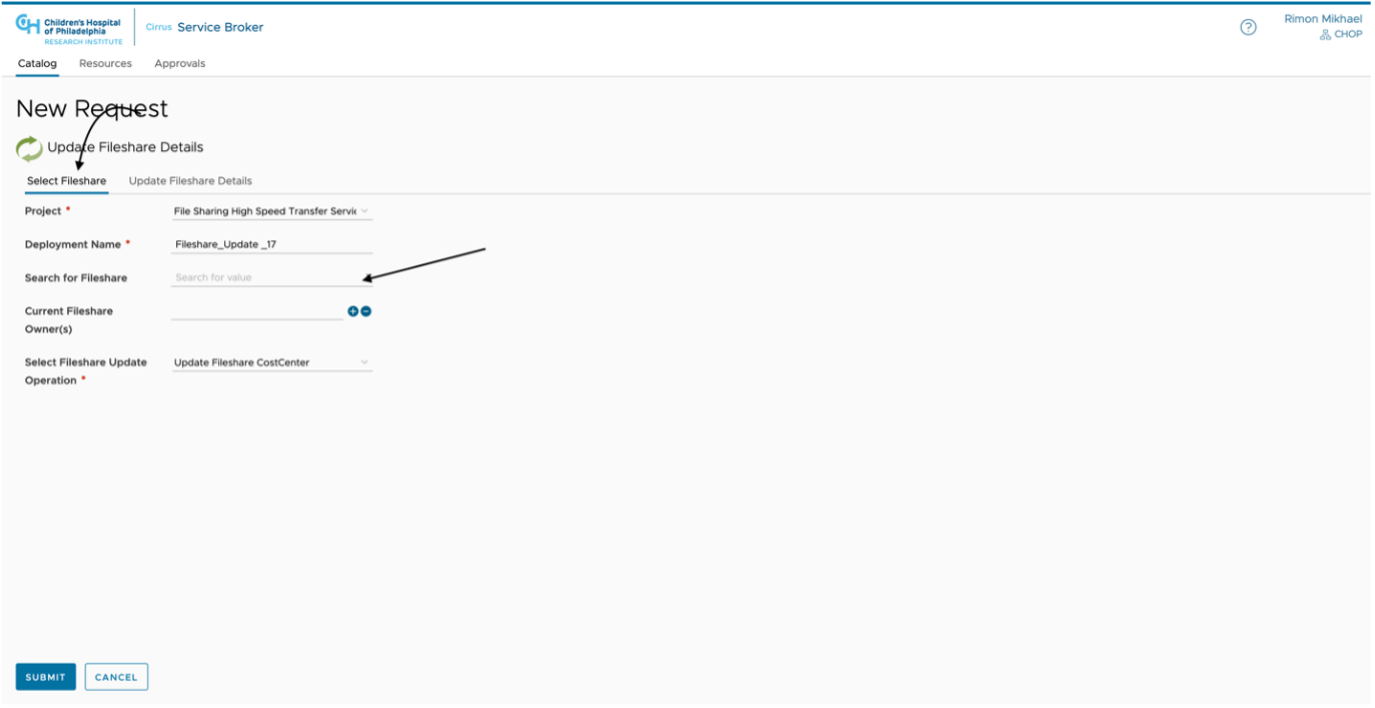
In the Search for Catalog Items field, type "FileShare" and Choose "Update Fileshare Details"
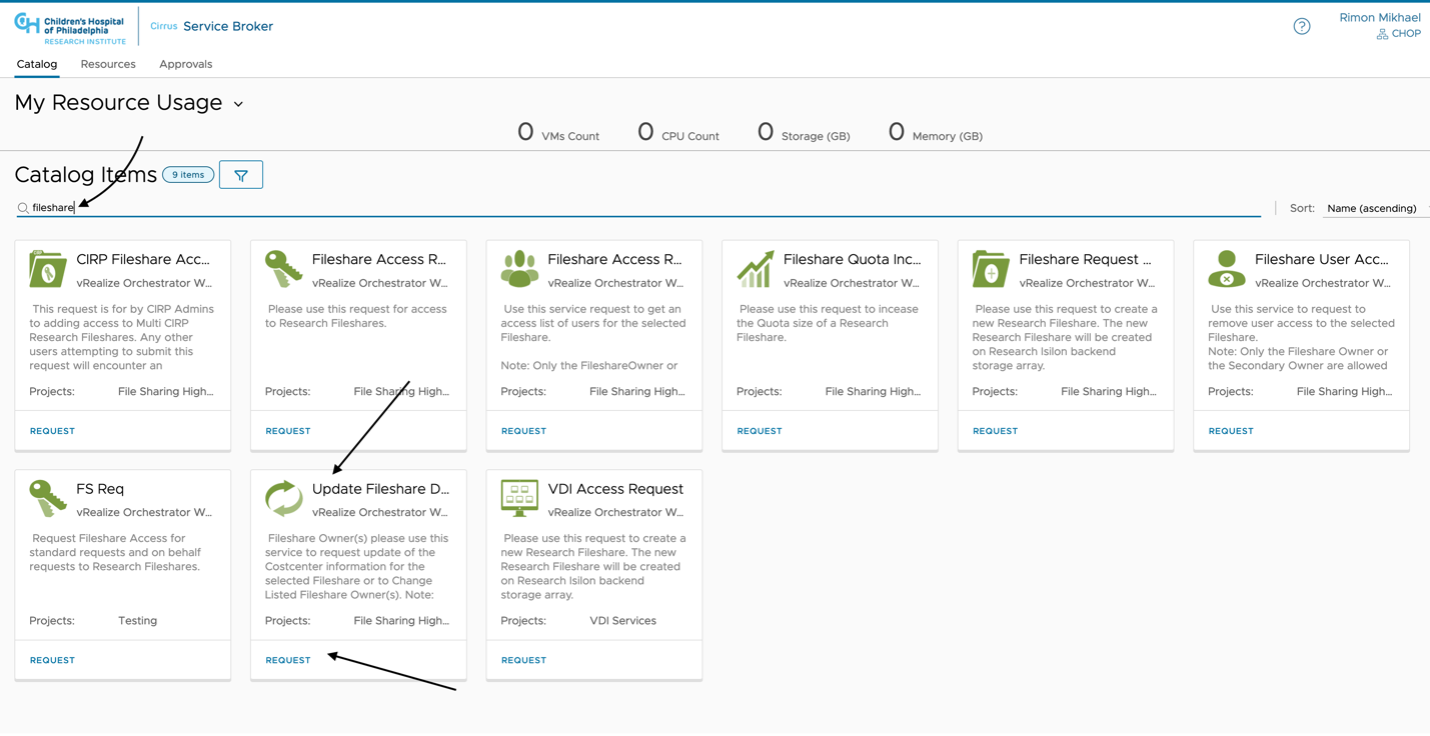
Or Click to Apply Filter and Select "File Sharing High Speed Transfer Services" catalog item in the left navigation pane
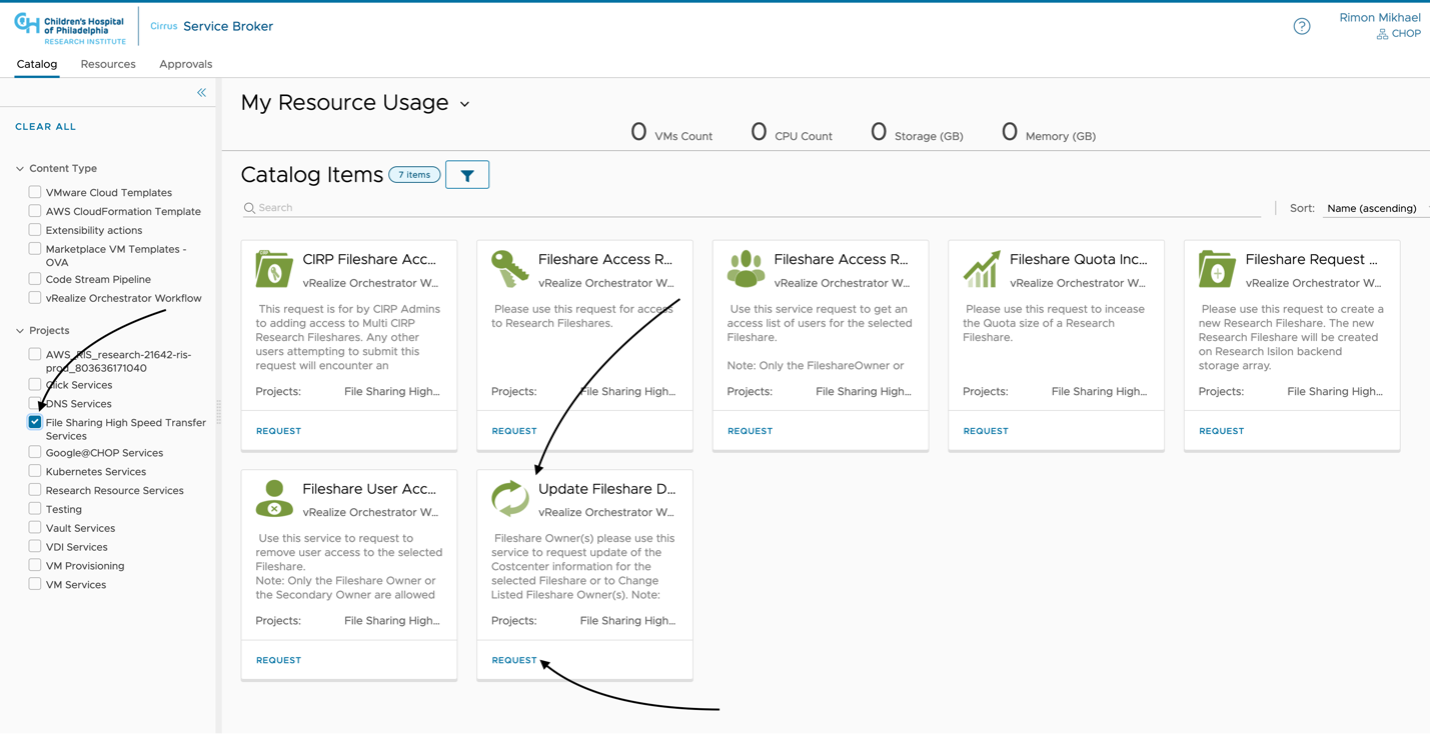
Step 6
Select the appropriate fileshare from the dropdown list or enter a search term in "Search Fileshare" to filter Fileshares. Note: Fileshare Path and Owner(s) fields will auto-populate.
Step 7
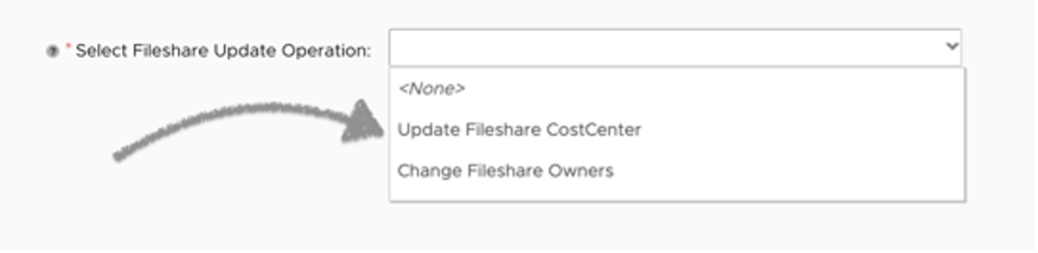
Select your choice of Either "Update Fileshare CostCenter" or "Change Fileshare Owners"
Step 8
Then Choose the next Tab
Step 9
For "CostCenter Update" please fill the appropriate fields and follow the instructions
Step 10
For "Ownership Update" please fill the appropriate fields and follow the instructions
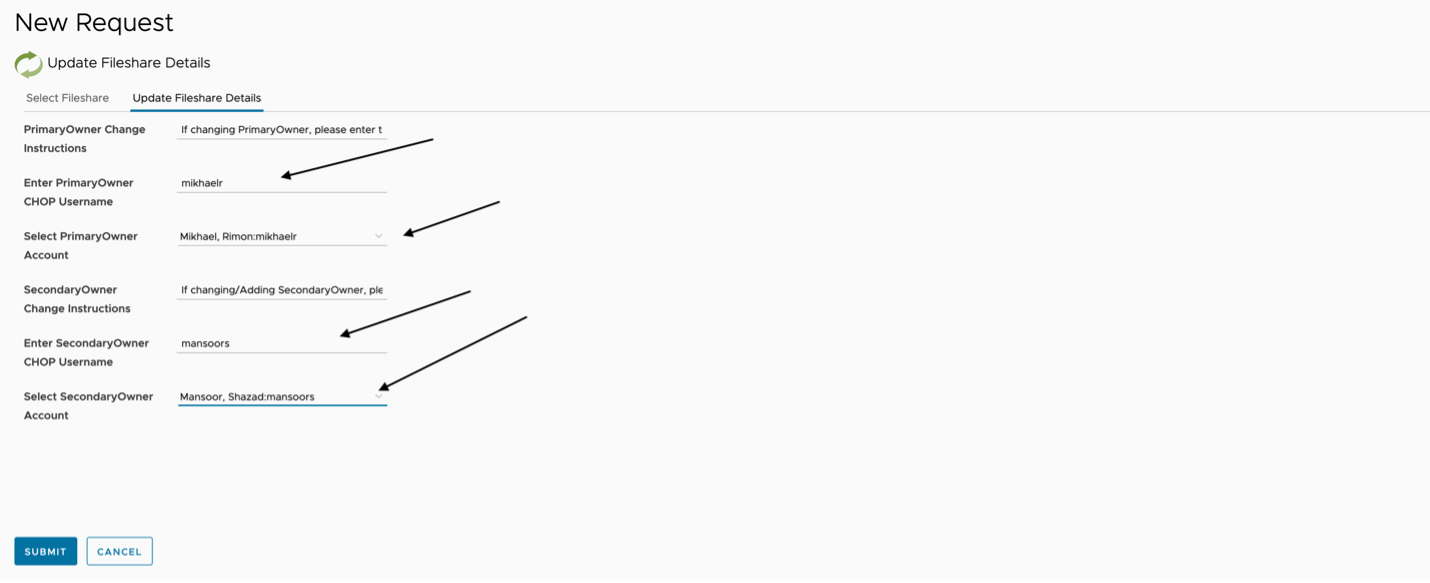
Step 11
Click "Submit" to Finish
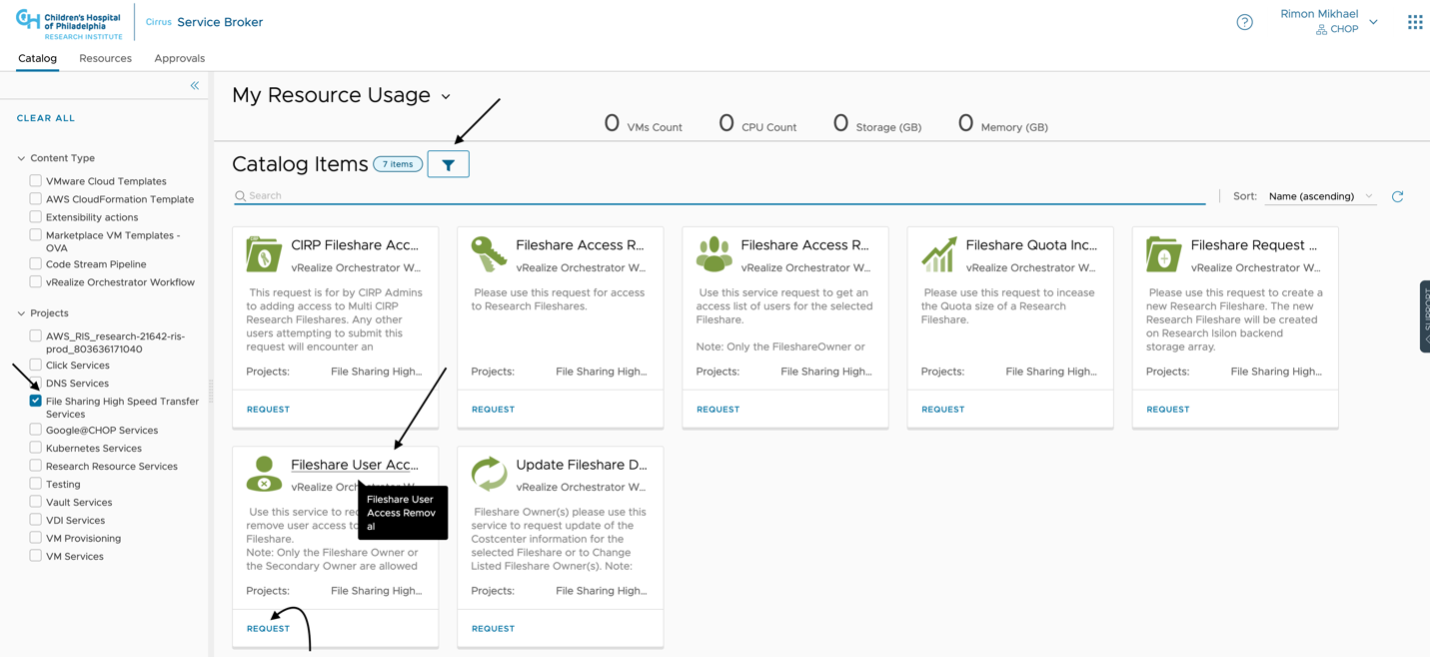
Service: Fileshare Owner(s) can Remove Fileshare Member(s)
Step 1
Connect to https://www.research.chop.edu/applications/cirrus and click "Cirrus Log In"
Step 2
At the Login prompt, enter your CHOP username, click "Remember this setting" and Click "Next"
Step 3
Enter your CHOP Password and Click the "Sign in" button
Step 4
Click on Catalog tab (It should be the default when first log in), also you are able to see any virtual machines resources were deployed in our virtualization environment.

Step 5
In the Search for Catalog Items field, type "FileShare" and Choose "Access Removal of Fileshare User"
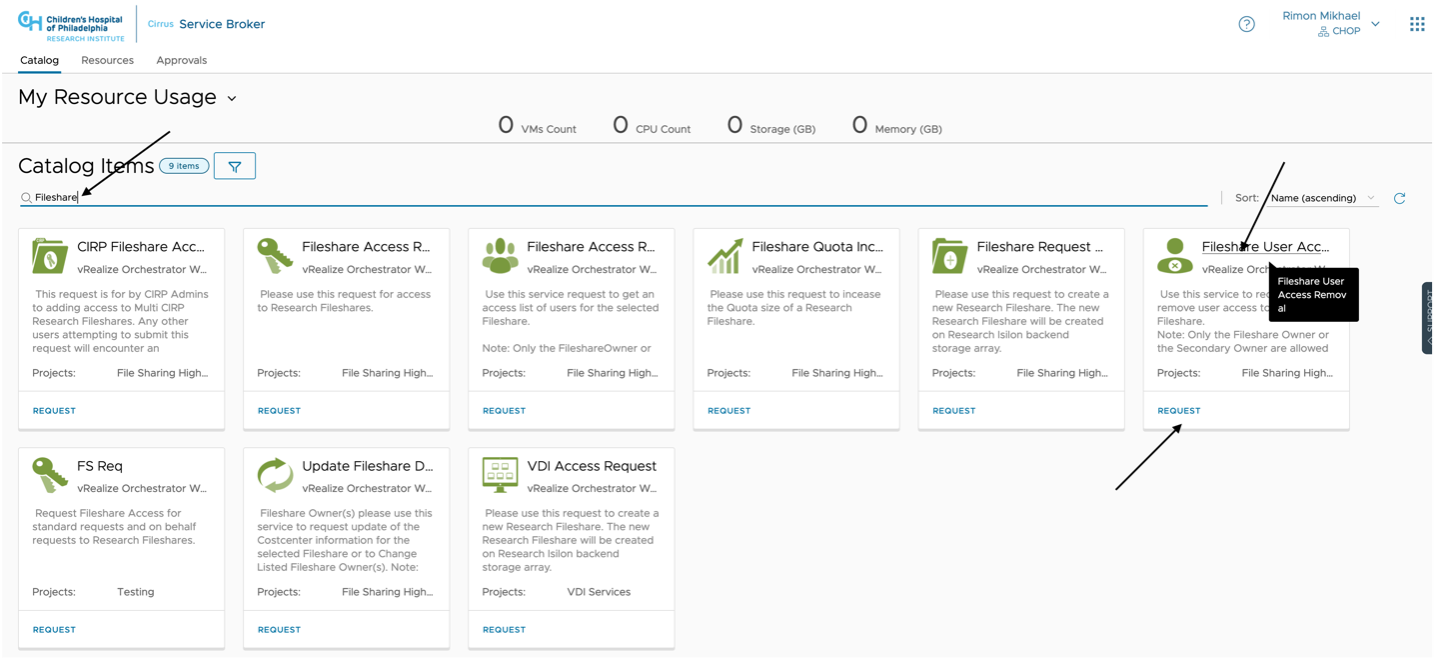
Or Click to Apply Filter and Select "Fileshare Services" catalog item in the left navigation pane
Step 6
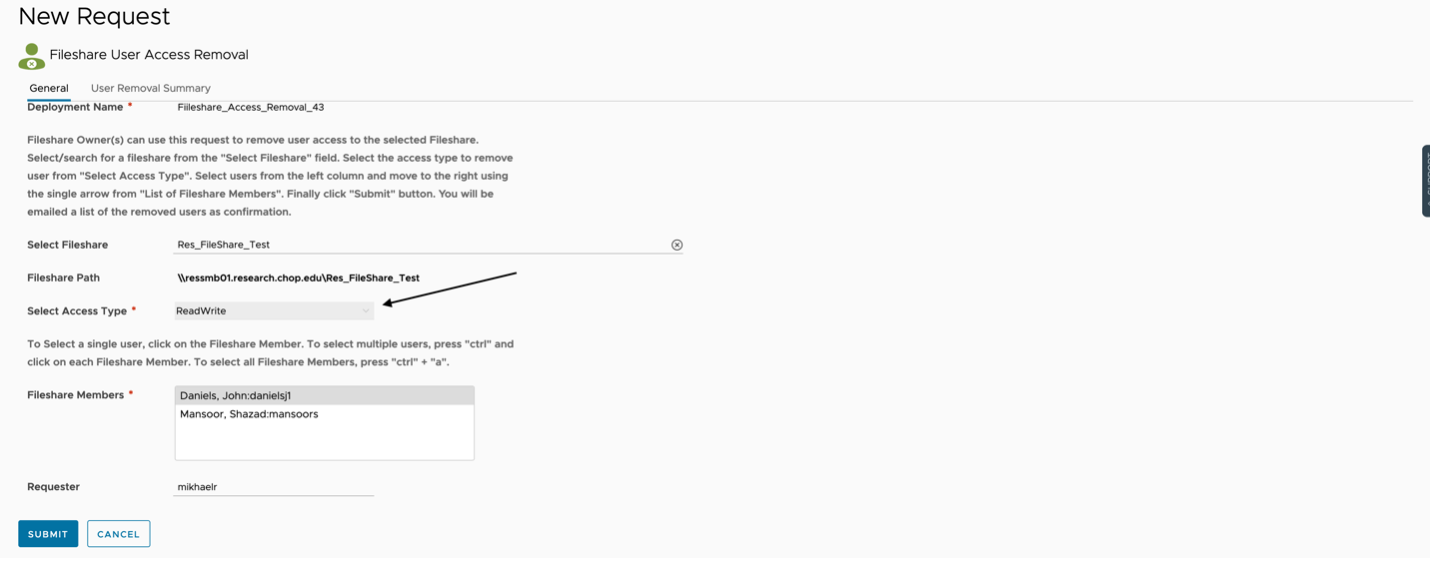
Enter a search term in "Search Fileshare" to filter Fileshares. Note: Fileshare Path and Owner(s) fields will auto-populate.
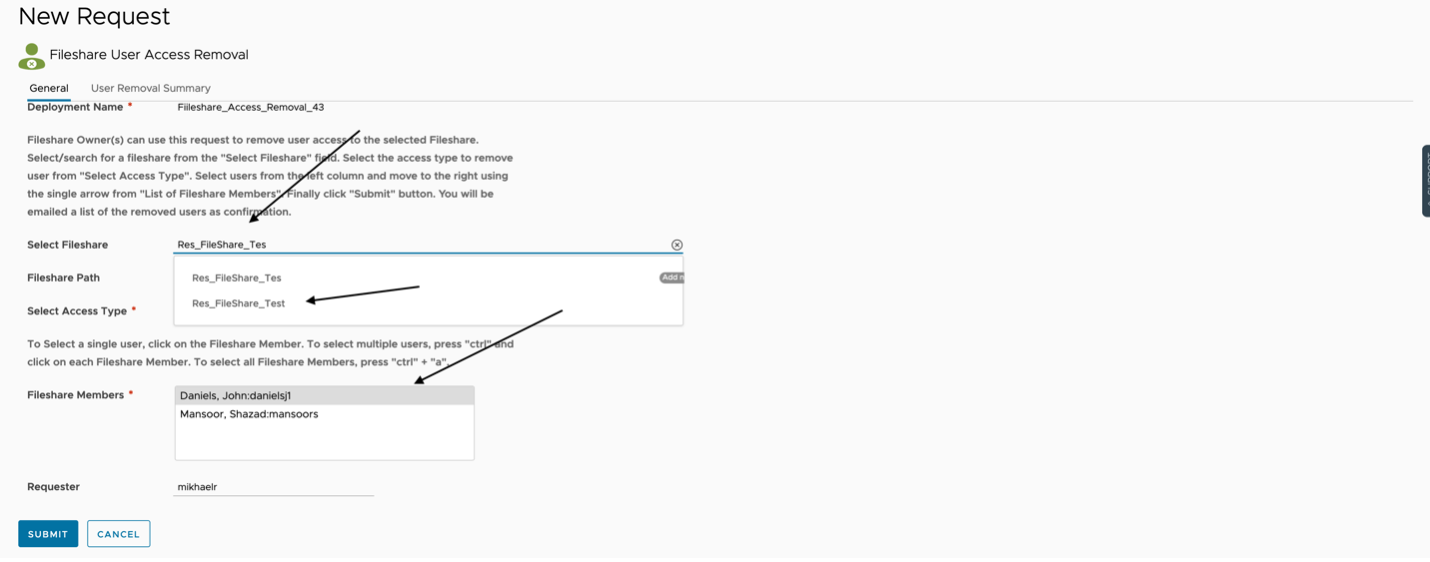
Step 7
Choose the permission type and which user you want to remove; you can choose multiple users by clicking 'ctrl1 and adding users to the list.
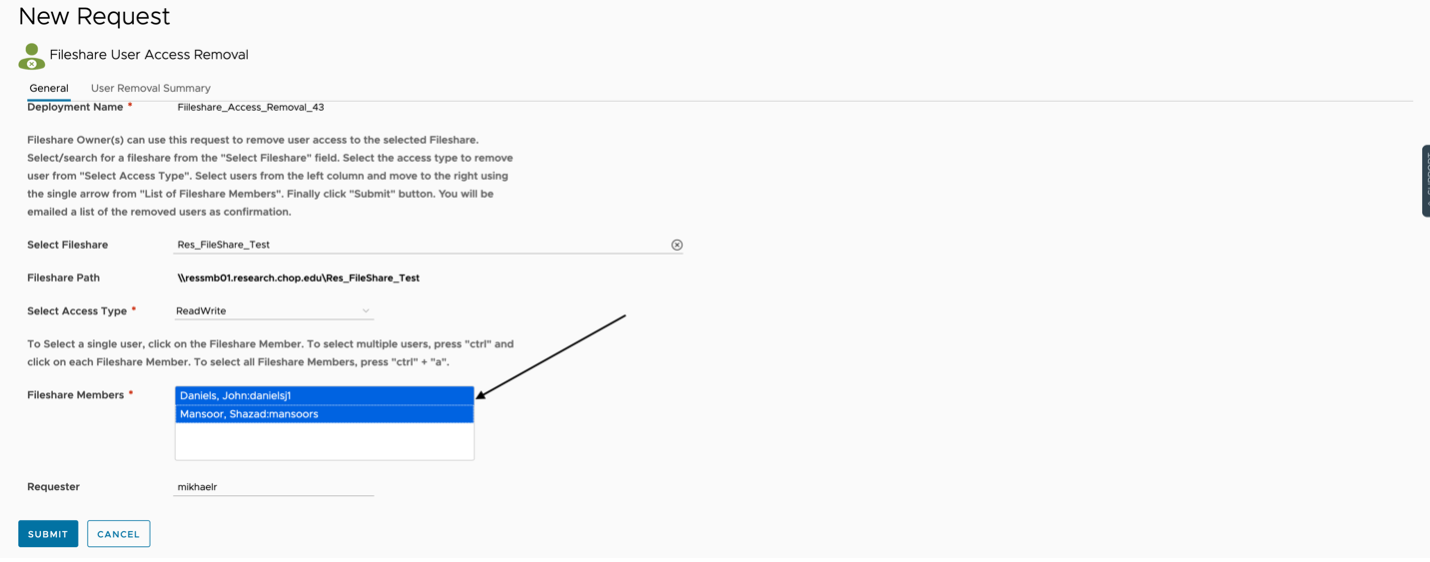
Step 8
Finish by Clicking "Submit"
Service: Requesting Access For CIRP Fileshare(s)
Step 1
Connect to https://www.research.chop.edu/applications/cirrus and click "Cirrus Log In"
Step 2
At the Login prompt, enter your CHOP username, click "Remember this setting" and Click "Next"
Step 3
Enter your CHOP Password and Click the "Sign in" button
Step 4
Click on Catalog tab (It should be the default when first log in), also you are able to see any virtual machines resources were deployed in our virtualization environment.

Step 5
In the Search for Catalog Items field, type "FileShare" and click "CIRP FILESHARE REQUEST"
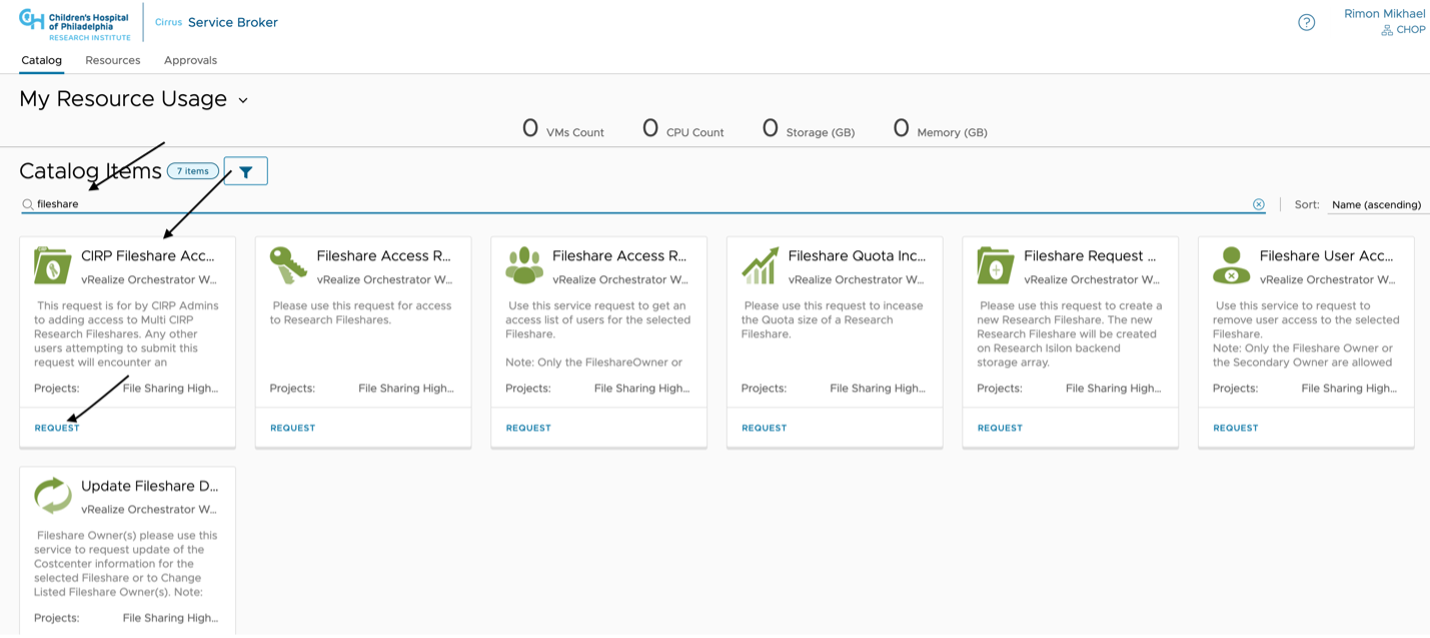
Or Click to Apply Filter and Select "CIRP FILESHARE REQUEST" catalog item in the left navigation pane
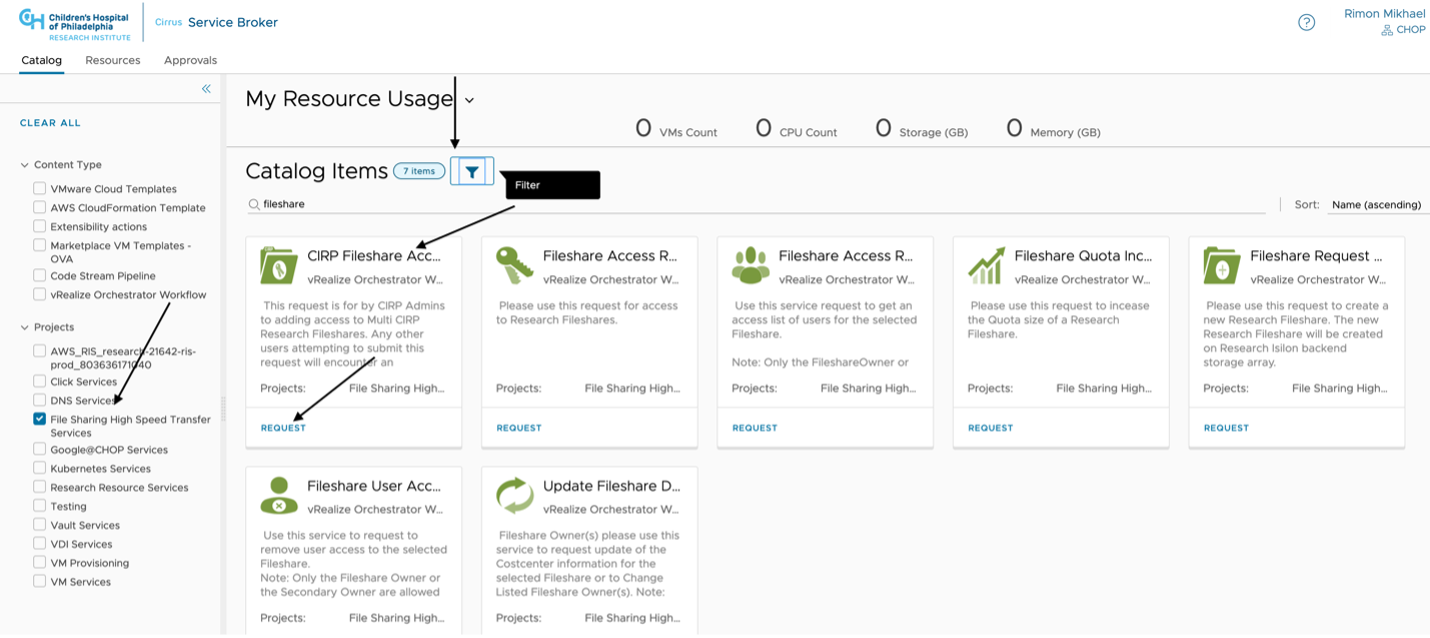
Step 6
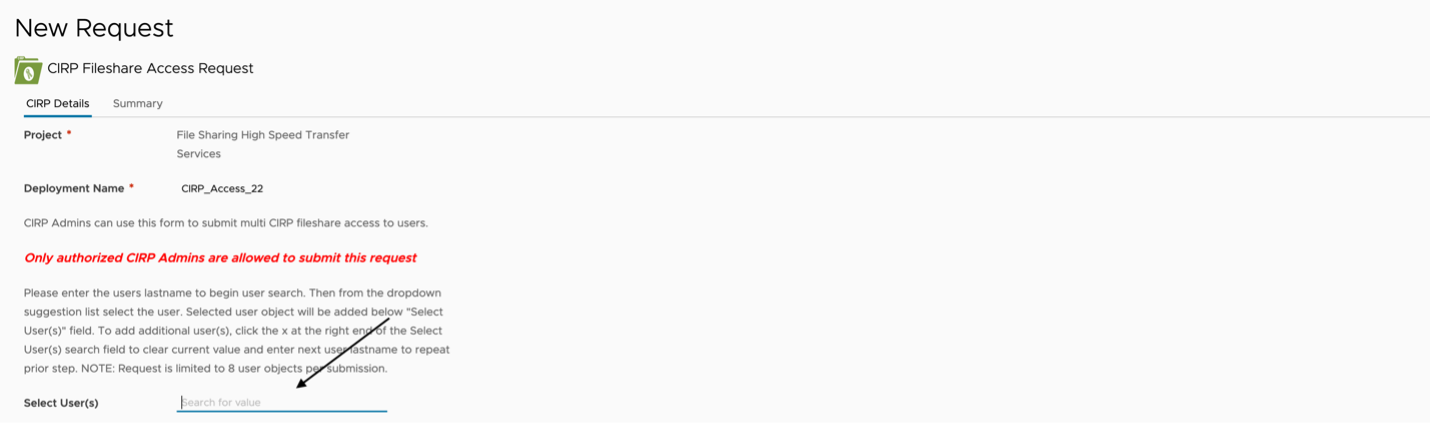
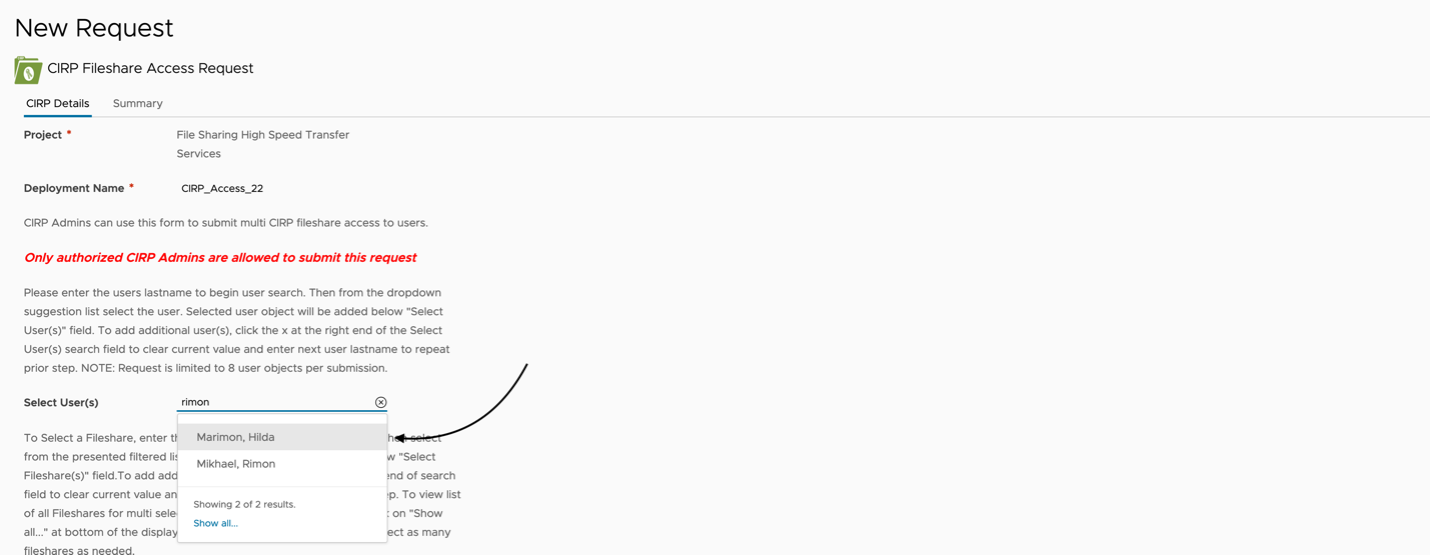
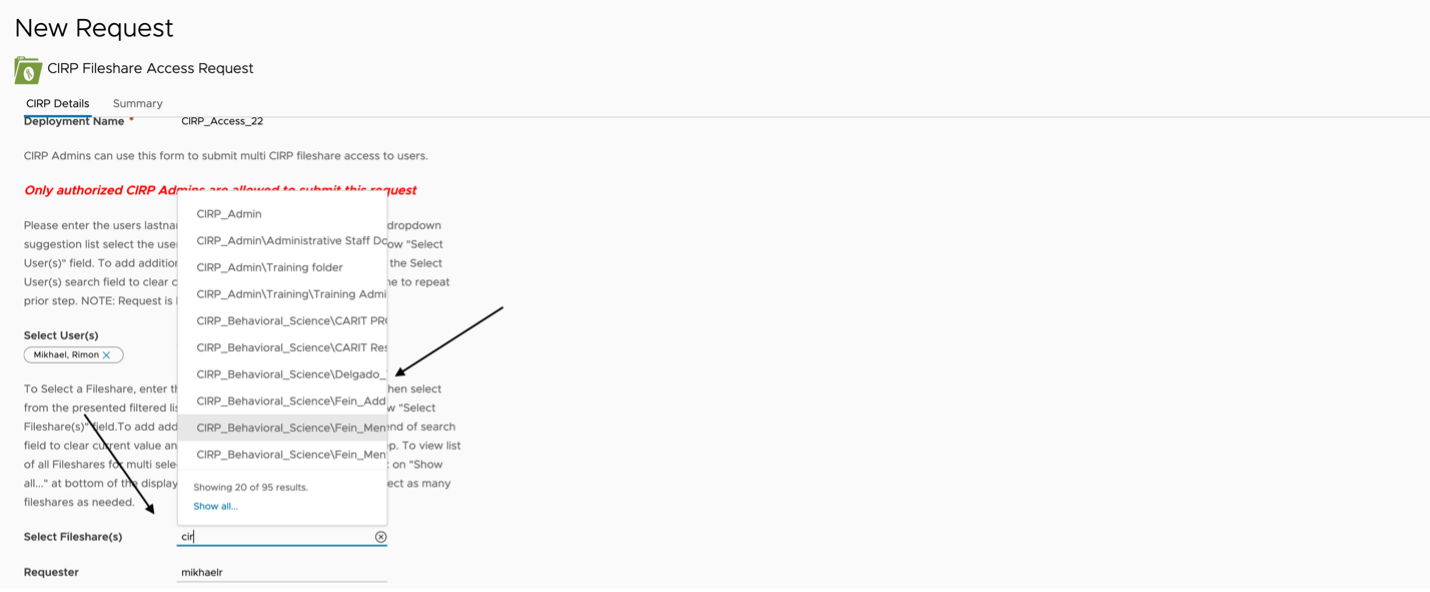
Follow the instructions, and Search for CHOP user.
Enter Chop user first name or last name and choose the user from the pop-up menu. If you need to add other users, please click the 'x1 icon or press delete to remove the name typed and type another user first or last name then choose the new user to add to the list – as per the screenshot below.
Step 7
Search and Select the Required Share
Step 8
Finish by Clicking "Submit"
Related Applications & Services


Owners can request a list of all users with access to their fileshares.


Request for CIRP Admins to add users to designated CIRP Fileshares.